Expert, unbiased guide to buying the best type of insulation for your home. Includes help with how much insulation is needed and the right type.


Are you spending too much on your energy bills? If your home’s insulation isn’t up to snuff, you may well be.
According to the U.S. Department of Energy, 44% of the energy used in the average American home goes toward heating and cooling. If your attic, walls, or floors are under-insulated, a large part of your costly conditioned air may be making a beeline for the great outdoors. This home insulation buying guide will help you make appropriate choices for your home.
How Much Insulation Is Enough?
Houses built in the last few years may or may not have optimal levels of insulation, depending on how much attention was given to energy conservation when they were built. But nearly all older homes are likely to be lacking. The best way to find out if your house has enough home insulation is to call your local utility company and request information about getting an “energy audit.”
Recommended minimum R-values for homes vary by climate and may be affected by how a house is built and the type of heating used. Here are a few rules of thumb:
For mild climates, have R-11 in the walls and floors and R-19 in ceilings below ventilated attics. For moderate climates, have R-19 in the walls and floors and R-30 in ceilings below ventilated attics. For cold climates, have R-19 in walls and under floors and R-38 to R-49 in ceilings below ventilated attics. (Visit the Department of Energy’s website at www.energy. gov for more specific recommendations by region.)
Types of Home Insulation
It’s easiest to consider the various insulation materials by category (though there is some overlap): batts and blankets, loose-fill, blown-in, plastic foam, rigid boards, and reflective. These categories are based primarily on the material’s form and installation method.
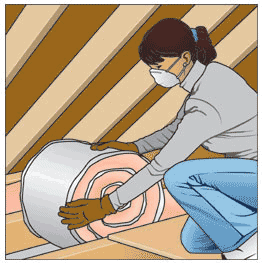
The batts-and-blankets variety is most familiar to homeowners and the type most commonly installed by do-it-yourselfers. The main insulating material is mineral fiber, either fiberglass or rock wool fibers.
Batts are sold as precut strips and blankets as continuous rolls. Both are sold in widths that match conventional wall-stud and ceiling-rafter spacings so they may simply be pressed or stapled into place. They are sold both with and without kraft or reflective foil/vapor- retarder facings. (A vapor barrier is faced toward the warm-in-winter side; types without a barrier are used when adding to existing insulation.)

The advantages of batts and blankets are that they’re readily available, easy for do-it- yourselfers to install, and relatively affordable. Installing them in non-standard stud or joist spacings takes a little extra time since the material must first be cut with a utility knife.
Loose-fill insulation—meant to be poured, stuffed, or blown in place—are made from glass and rock wool fibers, cellulose fiber, or expanded vermiculite and perlite. They’re made from the same spun minerals as batts and blankets but are left loose or made into pellets. They’re used in attics and walls.
Cellulosic insulation is made from recycled paper and wood fiber treated with a fire retardant. It’s used in both attics and walls.
Vermiculite is made from mica ore, and perlite comes from volcanic rock; both are heated and expanded into a fluffy, non-combustible material that is used to insulate ceilings and some walls (mostly concrete block).
Loose-fill materials are sold in bags or bales and work well for insulating between ceiling joists in an accessible attic. To fill up wall cavities, pneumatic equipment is often necessary. When using loose-fill insulation in an attic, it’s usually necessary to install a vapor barrier (such as plastic sheeting) first.
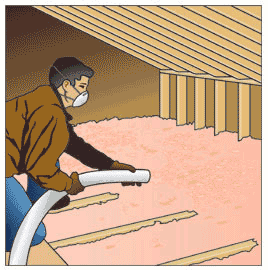
Blown-in loose-fill insulation is installed by professional installers or, in some cases, homeowners who rent the special pneumatic equipment needed. Effectiveness is a direct result of the application technique, so it’s usually best to have this done by a pro.
The material is loaded into a machine that then fluffs and blows it through a hose into the areas between ceiling joists or the cavities between wall studs. The insulation itself may consist of cellulose, loose mineral fibers, fiber pellets, or fibers coated with an adhesive (the latter type being the most effective at sealing a cavity and the least prone to settle once inside a wall).
Foam- or sprayed-in-place insulation (typically polyurethane) is installed by professionals who have special equipment for monitoring the mix and application. It provides very high R-values, doesn’t shrink or settle once in place, blocks drafts caused by air infiltration because it conforms to every nook and cranny, and offers a barrier to moisture.
Sprayed-in-place types are designed for new construction and can be used in walls, beamed ceilings, and around the foundation’s perimeter. They are relatively expensive. (Take note: Avoid urea-formaldehyde foam-in-place insulation because of potentially dangerous vapor emissions.)
Rigid foam-board insulation is made from a number of different materials: asphalt-impregnated fiber board, polystyrene, polyurethane, and polyisocyanurate. These rigid panels are generally used in new construction (or re-siding or reroofing), where they may be installed as wall or roof sheathing, or insulation beneath interior walls or around foundations. Because they are classified as combustible, they cannot be left exposed. The panels may have foil facings on one or both sides to reflect heat.
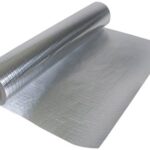
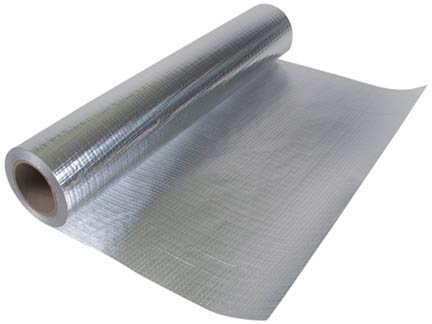
Reflective insulation, made from aluminum foil, is most effective in hot climates at blocking radiant heat. Effectiveness depends on whether the foil is simply a flat sheet, used to block heat transfer through roofs, or a barrier that has multiple layers separated by air spaces, appropriate for reducing heat gain through roofs, ceilings, walls, and floors.
One of the simplest and least expensive ways to lower your energy costs and cool your house in summer is to install a foil radiant barrier insulation in your attic.
Radiant barriers are made of a thin sheet of aluminum or other reflective material laid over attic insulation or secured to the roof rafters. The material reflects the heat absorbed by a roof on hot, sunny days, keeping the attic air cooler and thereby reducing the amount of heat transferred to the living spaces below.
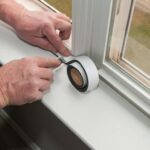
Depending on your climate and the amount and type of insulation in your home, radiant barrier insulation can significantly reduce your need for air conditioning, which in turn will reduce your utility bills as well as your A/C maintenance needs. Radiant barriers are especially effective if you take other steps to increase the energy efficiency of your home, such as sealing leaks in walls, weatherizing doors and windows, and adding insulation.
In new homes, installing a radiant barrier is easy because it can be applied to the roof decking before the decking is installed, or the decking can be purchased with a reflective material already applied to it.