How to build a brick and tile barbecue, with illustrated DIY instructions for planning and building an outdoor barbecue island.
A large grill and two-burner cooktop are set into this traditional barbecue island.
Concrete-block walls are faced with brick that has been manufactured to appear salvaged; the countertop is made from ceramic tile.
Barbecue Island Design
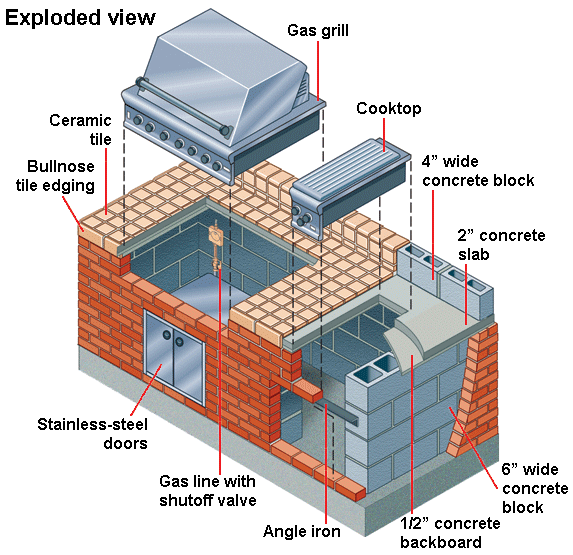
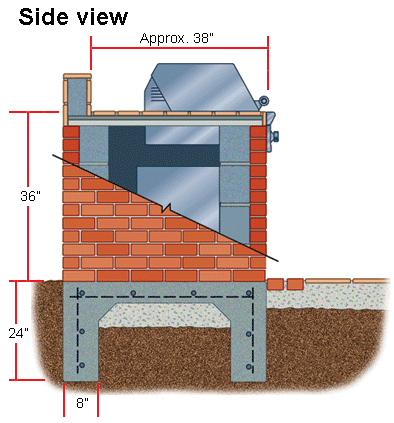
This rectangular island has two appliances up top and two storage areas below. The structure, made from 6-inch concrete block, is built on a concrete slab that has been reinforced. The walls are faced with brick and the countertop is tiled.
The total amount of usable counter space is about 4 feet, but the design can easily be adapted if your yard can accommodate a longer island.
The countertop is substantial looking due to the 3-inch edging and 4-inch backsplash.
The substructure is a layer of 2-inch reinforced concrete laid over 1/2-inch concrete backerboard. The substructure of the backsplash is 4-inch-thick block, making it wide enough to hold plates or serving pieces.
Preparing for Construction
Before starting any work, buy all of the items in the prducts and materials list below and have them on hand as you construct the barbecue island. A professional-looking masonry job calls for exacting work, so you will want to test fit the grill, burners, and storage doors as you go along to ensure a good fit. Before purchasing the ceramic tile, calculate how many tiles you will need for the surface area of the counter and backplash (as well as the bullnose tiles) and add 10 percent for waste.
1 Before excavating for the footing, check local building codes to see how thick the slab must be to support the weight of the finished structure. For this island, the perimeter footing is 8 inches wide by 2 feet deep. Before pouring the concrete, run the gas line and, if you wish, electrical line to the area. Then finish the slab.
2 Let the concrete cure for several days before beginning to build the island’s walls. The back and side walls will be solid concrete block; the front wall will have openings for the doors. Before setting the blocks in mortar, test fit the grill, cooktop, and doors to make sure they fit.
3 Face the block wall with the brick, applying mortar to the bricks as well as to the concrete block. Take care to create straight and consistent mortar lines. When you get to the tops of the door openings, install angle irons onto that layer of brick and then brick on top of them.
4 Cut concrete backerboard to form the base of the countertop. Make sure the edges of the pieces come flush with the outer edges of the brick. Then cut the pieces to accommodate the grill and cooktop and test fit the cooking units. Using a trowel, spread mortar onto the blocks and brick and then set the backerboard on top. Check for level at several points. Where the backerboard is unsupported, place 2 by 4s underneath every foot or so. Then build a form from 2 by 4s to line the perimeter of the backerboard. Mix a batch of sand-mix concrete and layer it on top of the backerboard to a thickness of 2 inches. Smooth the slab with the trowel.
5 Allow the concrete to cure and then remove the temporary supports and the 2-by-4 form. Place the tiles on the concrete, make whatever cuts are necessary, and then set the tiles in thinset mortar that has been reinforced. The bullnose tiles line the front and side edges and go on top of the backsplash. When the mortar has hardened (after a day or so), apply grout between the tiles.
6 Set the grill and the cooktop in place and make all the connections to the gas line. Then install the storage doors. Finally, caulk around the cooking units and the doors to make them watertight.
Materials List:
- Gas grill
- Gas cooktop with two burners
- Doors for two cabinets
- Gas line, shutoff valve, and connections
- Concrete blocks
- Rebar
- Mortar mix
- Brick manufactured to look used
- 3″ angle irons
- 1/2″ concrete backerboard
- Sand-mix concrete
- 2x4s
- Countertop tile
- Reinforced thinset mortar
- Grout
- Silicone caulk
Find a Pre-Screened Local Gas Barbecue Installation Pro



 Don Vandervort writes or edits every article at HomeTips. Don has:
