Expert advice on how to install a central vacuum system in new construction or an existing house.

Planning is the key to a successful central vacuum installation—both planning the layout and planning the process.
To install a central vacuum you:
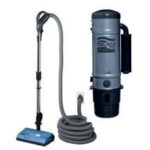
- Begin by locating and installing the power unit in the basement, garage, or another out-of-the-way place.
- Install inlet valves, strategically located throughout the home in wall-mounted (or sometimes floor) receptacles.
- Run plastic piping from the inlet valves to the power unit. This tubing, which runs through the walls and floors, carries dirt to a collection bin mounted in the power unit.(For more about how a central vacuum system works, see How a Central Vacuum System Works.)
Though central vacuum systems are easiest to install in new construction where it’s easy to install the tubing, they can be retrofitted into most existing houses with a relative ease. Just how easily depends on your house or, more specifically, on access to a basement, crawlspace, or attic for routing the tubing. If access is good and you are handy with tools, you may be able to handle installation yourself.
Following is more detailed advice for both new and existing construction.
Planning a Central Vacuum System
How to design the most efficient and effective layout plan for your house’s new central vacuum system
Whether you intend to hire an installer or do it yourself, you should first figure out the best places for the vacuum inlets—both for your own convenience when you use the appliance, and because locations will affect the ease of installation and, accordingly, the cost.


Every inlet you plan will raise the cost of a system and increase the possibility of air leaks, which decrease the system’s suction. With this in mind, plan carefully so that you can keep the number of inlets to a minimum.
Most houses need one or two inlets on each story, centrally located, so that every corner of every room is within the vacuum hose’s reach (typically about 30 feet).
Though inlets are best located along the base of interior walls, they may be installed in floors if they are placed away from foot traffic (all floor inlets should have metal covers).
In a single-story house with a basement or crawlspace, tubing can run under the floor and stub up a short distance into walls or directly serve floor inlets (by far the easiest method when retrofitting).
Interior, non-bearing walls not supported by foundations or beams are generally easiest to penetrate from below.
If a house has limited access below floors—as with a two-story house, for example—tubing must route elsewhere. Typical solutions are to run tubing vertically through laundry chutes, behind cabinets, exposed in closet corners, or boxed in at one of a room’s corners.
Another popular option is to run tubing horizontally in an attic and then drop it down through a wall or into a closet or cabinet. The best runs are short, straight, and direct.
Once you’ve established possible inlet locations, be sure they allow the vacuum’s wand to reach every corner of the house (including ceilings). Don’t forget to consider furniture and obstructions. To test your layout, stretch the hose and wand (or a small rope of equal length) from inlets to the far reaches of each room.
Plan to put the power unit/collection canister in the basement, a utility room, the garage, or a similar location away from living areas. Plan to position the unit on or near an exterior wall so the exhaust line can be easily routed outdoors. Though some central vacuum types don’t need to be exhausted outdoors, you can minimize dust generated by the unit if you exhaust it.
Don’t put the unit where temperatures may get hot, such as in a furnace room, small closet, or attic. The power unit requires good ventilation for long life and proper operation.
How to Cut and Glue PVC Central Vacuum Pipe
A central vacuum system utilizes a system of plastic pipe to carry dust and debris from the vacuum cleaner through walls and beneath floors to the power unit and canister that collects it.
The PVC pipe is very similar to PVC water pipe—it just has thinner walls, so it’s lighter in weight and easier to cut and handle. Like PVC water pipe, PVC vacuum system pipes and fittings are assembled with PVC cement.
Measuring, cutting, and assembling these pipes is a relatively easy job–the hardest part is usually drilling and cutting holes through wall studs and other framing members.
Step-by-Step Techniques
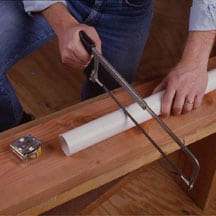
1 Cut PVC pipe to length with a hacksaw or a reciprocating saw equipped with a fine-toothed blade.
2 Smooth the rough-cut pipe ends, inside and out, with fine-grit sandpaper.

3 Apply a 1-inch-wide band of PVC cement around the end of the pipe only—not the fitting.

4 Immediately push the fitting onto the pipe end, twist it slightly, and hold the joint for about 30 second.

Installing the Power Unit
Begin the installation of a central vacuum system by mounting the power unit to a wall. Though methods may vary according to the make and model, the following instructions show you the basic techniques.
Use 2 1/2-inch-long screws to mount the plate to the wall; be sure to drive the screws securely into a wall stud.

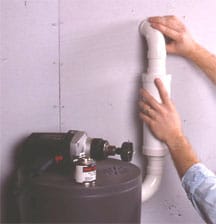
Hang the vacuum canister on its bracket and then hold up the exhaust line assembly, complete with muffler and elbows, and mark where it meets the wall. Cut through to the outside and mount the exhaust vent and its exterior wall cap.

Installing In New Construction
If you are building a new home or doing a major renovation, this is the perfect time to install a central vacuum system.
The method shown here is for a situation where tubing will run beneath the floor. If you’ll be running tubing through the attic (less desirable because the system must suction against gravity), modify the instructions accordingly. Start by planning the layout of the system as discussed above. (For information about connecting PVC vacuum tubing, see Working With Central Vacuum System PVC Pipe.)
Here is a helpful video that discusses step-by-step techniques for installing one of the popular brands of central vacuums in new construction: Nutone. For other brands, installation is very similar. Check your owner’s manual for any differences.
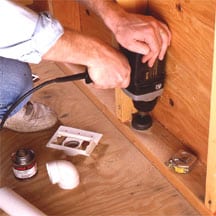
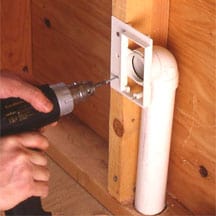
1 At the first location, use a wall-mounting bracket to measure for the location of the hole for the riser pipe. Then use a power drill fitted with a hole saw to bore a hole down through the wall’s bottom plate and the subfloor for the pipe. You’ll have to bore this hole in stages, prying out excess wood with a chisel every inch or so.
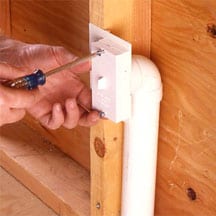
2 Assemble the elbow and wall-mounting bracket, and glue a length of pipe to the elbow to serve as a riser (this must be long enough to reach the horizontal pipe run beneath the floor). Screw the wall-mounting bracket to the stud.
3 Add a cover to the pipe to protect it from swallowing debris during construction (it is especially vulnerable to this during drywall installation).
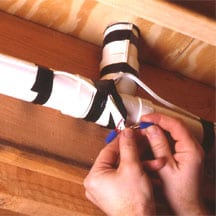
4 Beneath the floor, glue the riser to a T and the horizontal pipe run. Run low-voltage wires from the outlet locations, connecting them to a wire that runs all the way back to the power unit. Use black electrical tape to secure the wires to the pipes. Strip the wire ends, twist them together, and secure the wire connections with wire nuts.
Installing a Central Vac in an Existing Home
Installing a central vacuum system in an existing home can be a bit tricky, especially when it comes to installing inlet valves and PVC tubing in the walls.
Below we show you how to do this if you have access from under the floor for the horizontal runs of tubing. If you do not have under-floor access, you may be able to modify these instructions to run the tubing horizontally through the attic. To run pipes vertically, consider taking advantage of closets and other chases (such as a laundry chute).
This video by Ron Hazelton does a good job of showing you how to plan and route the pipes in an existing home without needing to cut open the walls.
Start by selecting locations throughout the house for the vacuum system’s inlet valves as discussed above. Space the inlets so the vacuum hose can reach every corner of the house. If you will be using an electric cleaning head, make sure an electrical receptacle is within 6 feet of each inlet.
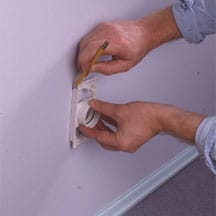
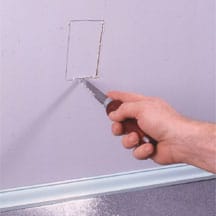
1 Mark the positions of the inlet valves on the interior walls at the same height as the electrical outlets. It is best to mount the receptacles next to wall studs—fittings are available for mounting valves directly to wallboard only—but it is not essential. Use an inlet valve as a template to mark the wallboard for cutting the inlet hole.
2 Cut the hole, using a keyhole saw or wallboard saw.
3 Drill a 1/8-inch-diameter hole through the floor directly below each inlet hole where the base shoe or the base molding will cover the hole. Push a wire through the bored hole so you can find the hole’s location when you go under the floor.

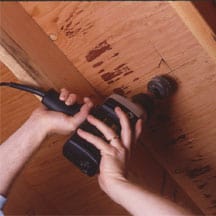
4 Go below the floor and use the wire as a reference point for measuring the location for the tubing that will go up through the center of the wall.
Cut a 2-inch-diameter hole up through the floor and through the 2-by-4 bottom plate of the wall, using a hole saw. You’ll probably have to do this in stages, using a combination of cutting with the hole saw and prying out chunks of wood with a chisel. Be sure to wear eye protection throughout the entire process.
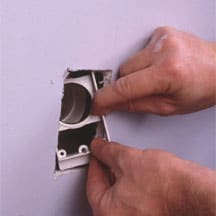
5 Run a suitable length of the vacuum system tubing up into the wall cavity to the inlet hole and have a helper hold it there. Go back into the room above, cement on a 90-degree elbow, and then slip the mounting plate through the hole and onto the elbow.
6 Repeat this process for all the other locations. (For more about connecting PVC vacuum tubing, see Working With Central Vacuum System PVC Pipe.)