Wiring Sprinkler Control Valves

Whether you have a simple sprinkler system or a complex one with five or more circuits, each circuit must be controlled by its own sprinkler control valve. Arrange your system so that each circuit controls a specific portion of your yard. For example, one may be used to control an array of micro-sprinklers or drip emitters for a flowerbed and containers.
Measure your water flow rate to determine the size pipe that should run from your supply source to the control valves. A supplier of sprinkler supplies can give you a worksheet to help you plan your system so each circuit will have enough water pressure. You will likely have one or two circuits turn on at a time.
In most cases, you will want to control all—or, in a very large system, half—of the valves with a single timer that will tell each circuit when to turn on and off. The easiest way to organize this is in a manifold system. Manifolds are made by sprinkler manufacturers and are easy to assemble. You can buy a system with a set number of circuits or put together any number of circuits.
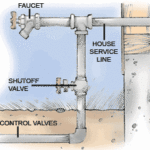
It’s important to have some form of backflow prevention to make sure irrigation water cannot back up into the house’s drinking water supply. Anti-siphon control valves have their own backflow prevention. They must be positioned at least 8 inches above the highest sprinkler head.
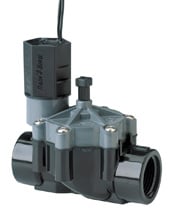
Place them near the timer so you will not have a long wire run. Install a shutoff valve just prior to the control valves. The valves are simply put together with threaded parts; you do not have to glue them. From the valves, run Schedule 80 PVC pipe, starting with a threaded piece down into the trench for the pipe runs to the sprinkler head.
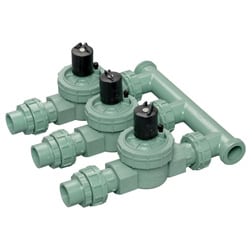
If you don’t want valves sticking up out of the ground, or if your highest sprinkler head is too high for anti-siphon valves, consider installing in-line valves instead (shown at left). These can be installed at any height, but you must first install a separate code-approved backflow preventer prior to the in-line valves.
You can place these valves in a box that is partially buried. Dig a fairly large hole to give yourself room to work and then install the box and the valves. They also assemble without glue and use Schedule 80 PVC parts. From the valves, run pipe through trenches to the sprinkler heads.
Wiring Sprinkler Control Valves
Use low-voltage insulated cable approved for burial (usually AWG-14 or -18) to connect the timer to the control valves. You will need multi-strand wire with enough wires for each valve plus one more to connect the valves to the timer. (So, if you have three valves, you’ll need four-strand wire.)


If there’s a possibility you’ll add on to your irrigation system, use wire with extra strands so you can add valves without having to rewire the entire system.
After connecting the wires, run them underground to the timer. Make use of sprinkler trenches where you can, placing wires underneath the pipes and loosely looping around each valve and bend in the trench.
Run the wire above ground when you get to the timer, and secure it to a wall or other surface to keep it from getting snagged. Make sure the timer is not plugged in while you are wiring.
Two wires run from each control valve; connect one of them to the common wire that runs to each valve and the other to the desired station number. Attach the timer and then connect the common wire to its screw terminal, remembering which circuit uses which station.