This guide will teach you how to install a drip irrigation system for watering your plants efficiently and conserving water. It discusses the different types of drip irrigation components, and how to to layout and install a drip irrigation system yourself.

Selecting Drip Components
Placing the Components
Laying Out The Drip System
Tools & Supplies
First Drip System Installation Steps
Watering Random Plantings in Beds
Straight Rows & Vegetable Beds
Container Plant Drip Watering
As compared to installing an automatic sprinkler system, installing a drip system is a snap. There is no need to dig trenches, connections are as simple as plugging in an electrical cord, and measurements don’t need to be precise.

All that is required is figuring out what types of tubing and emitters you will need, their capacities, and how many you will need.
Installing a drip system to supplement an underground sprinkler system can be done in a day. If the drip system will be your sole means of watering, with careful planning, installation can be done in a weekend.
Start with your garden plan, making some extra copies before you mark it up. If all the plants have roughly the same watering requirements and your garden is small, a single circuit can handle your entire drip system. Otherwise, you’ll need at least one circuit per hydrozone.
Selecting Drip Components
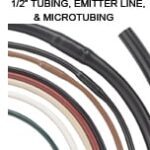
Different drip watering devices are better suited to different hydrozones. Individual drip emitters are useful for watering widely spaced plants, whereas emitter line and sprayers are better for closely spaced plants.
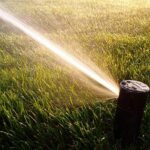
Use emitter line for watering rows of plants, shrubs, or trees. Opt for drip emitters or emitter line to keep foliage dry, but use sprayers or minisprinklers if your soil is very porous or sandy.
Don’t worry if some of the devices you select prove to be inadequate, however. You can make changes or additions once the system is in place. (See the drip emitter information chart for more information.)
Placing the Components
To determine how many drip devices you’ll need for each plant and where to place them, consider the type of soil and the size of the root zone (the horizontal extent of the roots). The devices you select should always water more than 50% of the root zone.
You can use devices with different flow rates to deliver more water to some plants and less to others on the same circuit. Just be sure to put drip emitters on separate circuits from sprayers and mini-sprinklers, which require more pressure and put out significantly more water.
If you want to maximize the number of drip devices on a single circuit, choose the slowest drip emitters or sprayers and water for a longer period of time.
Mark the devices and their outputs for each area on your garden plan, as shown in the illustrations below. Note where any pressure-compensating emitters are needed, such as on slopes. Also sketch in lines to connect the watering devices in each circuit to a control valve.
Laying Out The Drip System
Once you have mapped out your watering devices, you can compute how much tubing and how many fittings you will need. When laying out the main drip line for each circuit, try to connect emitters directly to the line whenever possible.
Microtubing serves a purpose, but too much can be a nuisance. It snags rakes and tools and is easier to displace or damage.
For drip tubing on a slope, plan to run a main drip line downhill and tee off it with separate horizontal runs of tubing rather than weaving one line across the hillside.
List the number of devices of each type by output and calculate the total output for each circuit. If the total output from your watering devices is much less than the maximum, or if you are using pressure-compensating emitters, the tubing can be longer. If it’s over the maximum, change to slower devices or use more than one circuit for the hydrozone.
For a drip circuit that starts farther out than 200 feet from its control valve, lay PVC pipe underground to the irrigation area and run your drip tubing off a riser. Alternatively, run 3/4-inch polyethylene tubing aboveground to the start of the new zone and connect 1/2-inch tubing to it there.

Tools & Supplies
The tools to install a drip system are simple and easy to use. Cut the tubing with a good pair of pruning shears or a utility knife. A specially designed punch makes holes in tubing for emitters and connectors, and “goof plugs” (shown at right) stop up holes in the wrong spots. Stakes hold tubing in place.
First Drip System Installation Steps
When installing a drip irrigation system, start by organizing all the pieces by size and type—fittings, drip emitters, sprayers or minisprinklers, misters, bubblers, goof plugs, and stakes—and place them into separate marked bags.
Connect the drip system to your water supply, construct a head assembly, and then position the water lines where you want them. Turn on the water to flush out the lines and then install the various components. Should you change your mind about a component or about the positioning of the lines, you can always make adjustments as you go along.
Connecting At A Hose Bibb
A head assembly connects at a hose bibb just as a hose would, by threading on. The flow rate for the assembly will be less than that of the faucet, so make sure the combined flow of the circuit’s watering devices does not exceed the maximum flow rate of the assembly.
To construct the head assembly at the hose bibb, screw on a vacuum breaker, a filter, a pressure regulator, and then a thread-to-tubing compression adapter. If you want the system to have a timer, screw that on first. If you want a fertilizer injector, screw that on after the vacuum breaker. Do not tighten any of the connections with a wrench; the washers should seal with simple hand-tightening.
Connecting At a Control Valve
If you are connecting a drip irrigation system to a sprinkler system, the head assembly connects to the control valves of the sprinkler system with piping. Wrap the threads on the piping with pipe- thread tape and then tighten by hand or very gently with a wrench.
The parts are marked with arrows; assemble them so that the arrows point in the same direction as the flow of water. To connect a head assembly at the control valve, screw on the filter, then the pressure regulator, and then a thread-to-tubing adapter. If you want a fertilizer injector, install it before the filter.
Proper Drip Methods for Plants
When using a drip watering system, it can be a challenge to know the best methods for delivering water. What is the best type of drip watering equipment, and how should it be routed? Following are tips for specific drip watering situations:
Random Plantings in Beds
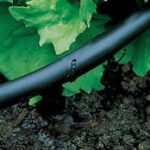
When plants are randomly spaced, run 1/2-inch tubing through the bed so that it passes as many plants as possible.

If a circuit covers just one planting bed, a good technique is to create a spiral around the area, starting with the plants on the outside of the bed and spiraling the tubing into the center.
Another option is to run the tubing in a snake pattern and send 1/4-inch microtubing off the main drip line to individual plants farther away.
Straight Rows & Vegetable Beds
The most efficient way to irrigate long rows of plants with drip is to run parallel lines of 1/4-inch or 1/2-inch emitter line along the row of plants. Tee off the lines from the main drip line. You can also use drip tubing with emitters rather than emitter line.

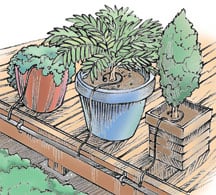
Container Plant Drip Watering
Container plants require their own circuit because they need to be watered more frequently—as much as twice a day in summer.
First run a 3/8-inch or 1/2-inch main drip line from your head assembly to the container area; you can hide it along a wall or walkway, or even under a deck. Although 3/8-inch tubing is less noticeable, it should not be run farther than 100 feet.

Next, tee off the main drip line to run 1/4-inch microtubing to the pots. You can run it over the lip of the pot (using an elbow will keep it flat) or up through the drainage hole. Depending on the container and the plant, the microtubing can connect to one or more drip emitters, to a 1/4-inch emitter line, or to a small bubbler, sprayer, or mister.
Use heavyweight vinyl tubing instead of polyethylene. It will hug the contours of the container and turn corners without elbows or other fittings. It also comes in several colors to blend with the container color.
For hanging baskets, run microtubing up posts, under eaves, or in the joint between two walls. To prevent backflow, leave at least 2 inches between the drip emitters or misters and the foliage or soil.