Expert step-by-step instructions for installing a conventional storage tank–style water heater

Installing a Gas Water Heater
Installing an Electric Water Heater
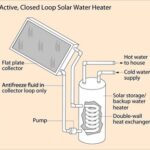
For many homeowners, replacing an old water heater is simpler than they imagine, especially if the new unit is similar to the old one. If you want to switch from electric to gas or vice versa, however, discuss the various installation options with a professional. For information on buying a water heater, see our Storage Water Heater Buying Guide.
If your home is in an earthquake zone, you will need to install straps around the new water heater (check with your local building department for exact specifications).

If the new tank is a different height than the old one, use flexible pipe connectors for the water inlet and outlet; they will bend as needed to make the hookup.
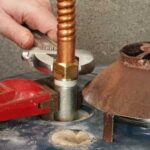
If the pipes are not threaded, replace them with threaded nipples, and secure the connectors to the nipples with an adjustable wrench. Install a new temperature and pressure-relief valve on the new tank, and test it by squeezing the lever.
Installing a Gas Water Heater
Below you will find step-by-step gas water heater installation techniques. The following video gives you a great overview of the process for installing a gas water heater, from unpacking it to testing for gas leaks. It even shows how to secure the water heater with earthquake straps. For a video on installing an electric water heater, move further down this page.
Step-by-Step Gas Water Heater Installation
- After shutting off the water and gas or power supply to the tank, connect a hose to the drain valve at the bottom of the tank, open the valve, and run it to a nearby drain or to the outdoors. Use two wrenches to unscrew the inlet and outlet fittings from the top of the tank.

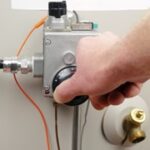
2. For a gas water heater, shut off the gas inlet valve and use two wrenches to disconnect the union or flare fitting between the gas supply pipe and the inlet valve. Also remove the flue hat that expels gases into the flue at the top of the tank.

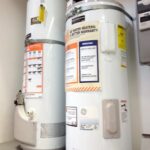
3. After removing the old unit, set the new one in place with the controls and burner accessible. Allow at least 6 inches of clearance around the new unit’s perimeter, and keep it away from flammable materials. Use a level to check it for plumb; shim the base with pieces of asphalt shingles or plastic wedges as needed.

4. Wrap the threads of the heat trap fittings with pipe-wrap tape, and screw the fittings into the water heater (blue into the cold water inlet and red into the hot water outlet). Be sure the arrows marked on the fittings point in the direction of the water flow.

5. Install new flexible connectors on the water inlet and outlet pipes. If there is no shutoff valve on the cold water side, install one before connecting the water heater. After all connections are complete, open the shutoff valve to fill the tank. While it is filling, open several hot water faucets in the house to bleed off air in the pipes.

6. Assemble the gas pipes. Spread pipe dope on the threads, and screw together the parts, tightening them with one pipe wrench on the pipe and another on the fitting. Follow the manufacturer’s instructions for connecting the unit with gas supply tubing. After turning on the gas, test all connections by brushing soapy water on them and watching for bubbles.

Installing an Electric Water Heater
Installing an electric water heater is similar, but instead of gas pipes and venting, it requires an electrical hookup. This excellent video shows the process for installing an electric water heater.