Expert advice, including videos, on how to replace a central air conditioner’s capacitor and contactor when a central AC unit doesn’t work at all.

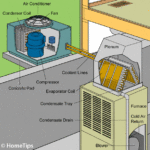
If your central air conditioner is not working at all, it’s likely that the problem is the outdoor compressor’s capacitor or contactor. The capacitor, sometimes called a “run capacitor,” starts the condenser and the fan in the outdoor unit. If the capacitor fails, the air conditioner won’t run.
What are the signs of a failed AC capacitor or contactor?
The most common sign of a failed capacitor is a clicking sound followed by a buzz or hum. Although you can sometimes start the compressor fan spinning (clockwise) by pushing it with a thin stick or long screwdriver poked through the grille, this is a temporary fix. You’re better off replacing the capacitor.
If you don’t hear a buzz after the compressor clicks, the problem is probably the contactor, which will need to be replaced.
Should you do it yourself?
If you are an accomplished do-it-yourselfer and can work safely with electricity, you can easily test and replace these inexpensive parts. Most new capacitors costs less than $60 and an AC contactor is less than $45.
However, if you don’t have the necessary skills, or tools, leave these repairs to an HVAC repair professional. To have these professionally replaced typically costs from $90 to $450.
Following is how to replace both the capacitor and the contactor.
How to Test and Replace an AC Run Capacitor
Before opening the electrical cover on the A/C unit, be sure to shut off all power to the compressor unit and the indoor furnace or air handler, and verify that it is off. Note that this may mean shutting off a circuit breaker that serves the furnace and air handler, and then, near the compressor, pulling out the disconnect block (or shutting off the 220-volt power) to the outdoor compressor.
 A capacitor usually fails when you need it most. When you explore your AC unit’s compressor to check out the capacitor, note the exact type and specifications. Whether or not your capacitor has failed, order a replacement on Amazon to keep on hand for when you need it.
To work safely and effectively, please watch the next three videos below before beginning.
Beware: An AC capacitor stores voltage and could shock you! Do not touch the terminals. Before working on it, discharge the capacitor as shown below.
To get to the capacitor, remove the compressor unit’s access panel as shown in the capacitor testing and replacement videos below.
Safely Discharge the AC Capacitor
To discharge a run capacitor, wear safety glasses and gloves. Hold the handle of an insulated electrical screwdriver (not touching the metal!), and use the screwdriver’s blade to bridge across the terminals on the capacitor. Be prepared for a spark!
This video shows the techniques:
Test the Run Capacitor
Standard capacitors have two terminals at the top, and dual capacitors have three terminals: one common terminal (C), one fan terminal (F), and one hermetic (Herm) terminal for the hermetically-sealed compressor. At the other end of the capacitor, the line-voltage wires connect to two additional terminals.
Using a digital multimeter set to “Capacitance,” put one lead on the Common (C) terminal and the other lead on one of the other two terminals. The meter should show a number—not “OL” which indicates a short.
Here is a video that shows more precisely how to test and replace a capacitor.
Tip: Take a quick digital photo of the wires before disconnecting them so you know where to replace them.
Replace the Capacitor
Here is another video that shows how to change the capacitor. This offers another way to remember which wires go to which terminals:
Please note: If you don’t clearly understand how to properly and safely replace the capacitor, please call an HVAC pro.
Still not working? Check and, if necessary, clean or replace the AC contactor. Also read “Air Conditioner Not Blowing Air,” below.
How to Check and Replace an AC Contactor
The contactor is essentially a switch that controls the compressor and the condenser fan motor. If it is fried or jammed with bugs and dirt, your AC won’t work.
If the AC doesn’t run or hum but you hear it clicking, the contactor probably needs to be replaced.
Before working on this, be sure to shut off all power to the compressor unit and the indoor furnace or air handler, and verify that the power is off.
Note: When working on the contactor, you will be working near the charged capacitor, which can shock you. Please see Safely Discharge the AC Capacitor.
The following video shows you how to replace the contactor. We recommend that you take a photo of where the wires are connected to the contactor before removing them so you can see where they go on the new contactor.