In the battle against winter cold and sky-high home energy costs, the first line of defense is home insulation. According to the Environmental Protection Agency’s estimates, homeowners can save an average of 15% on heating and cooling costs by sealing up air leaks and adding insulation to their attics.

And that’s just the average.
If you live in the northern part of the United States, your savings may be even greater because the climate is more severe and energy for heating can be more expensive.

The really good news is that adding insulation is an improvement that may qualify for tax credits and is excellent at returning value on your investment.
For up-to-date information about available tax incentive programs, see EnergyStar.gov. You can check on whether additional programs are available in your state at http://www.dsireusa.org/.
When it comes to value, Remodeling Magazine’s 2016 Cost vs. Value study determined that the addition of fiberglass insulation to an attic offers a better return on investment than any of the other 30 projects studied in this year’s report. Their cost source, RemodelMAX, estimated the average nationwide cost of insulating an attic to be $1,268. Real estate professionals who responded to their survey projected that, within a year of insulating, this improvement would increase the average home’s sales price by $1,482, resulting in a 116.9% return on the investment.
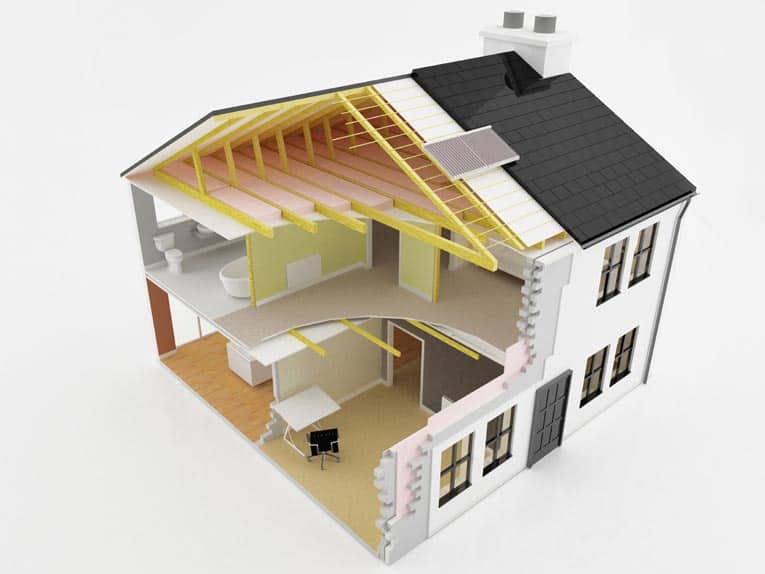
Basic home building materials used for siding and roofing are great at providing shelter but readily allow the conduction of heat. The result is heat loss in the winter or heat gain in the summer. Insulation materials, typically made of fiberglass, cellulose or foam, have an open-cell structure that resists heat transfer—so when these materials are added to attics, walls and floors, they reduce energy loss. Just how effectively they do their job depends on the particular material and quality of installation.
Understanding R-Values
The effectiveness of insulation is rated by R-value. The higher the R-value, the greater the material’s ability to insulate.
The R-values to target in your home depend primarily upon your climate and secondarily upon the part of the house being insulated. It’s most important to insulate the attic because that’s where the majority of a home’s heat is lost.
Each inch of fiberglass blanket insulation, for example, provides an R-value of about 3.27.
Loose-fill insulation can vary from about 2.2 to 4.0, depending on how effectively it is installed.
Sprayed polyurethane foam can be rated as high as 6.0 to 7.3. Air pockets, shallow coverage or compressed insulation cause diminished effectiveness.
For a more in-depth comparison of different kinds of insulation, see the House Insulation Buying Guide.
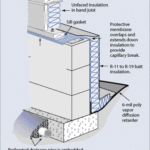
Recommended R-values for walls, ceilings, and floors vary from one region to another and may be affected by the type of heating that is used in the home. Building codes in most mild climates specify R-11 in the walls and floors and R-19 in ceilings below ventilated attics.
For moderate climates, R-19 is needed in the walls and floors and R-30 in ceilings below ventilated attics. Cold climates call for R-19 in walls and under floors and R-38 to R-49 in ceilings below ventilated attics.
You can pinpoint appropriate amounts of insulation for homes in your area by visiting to the U.S. Department of Energy’s website, Energy.gov, and entering your zip code. Note that the lowest recommended amount is R-30, which is the equivalent of about 10 inches of fiberglass or 8 inches of cellulose. For very cold climates, R-60 is recommended.
Calculating Insulation Needs
If your attic already has some insulation, you’ll need to measure its thickness to figure the amount you should add. When in the attic, be sure to stand or kneel only on fully supported planks or joists—if you step between the joists, you’re likely to fall through the ceiling below.
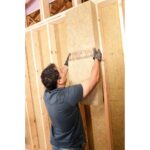
Before insulating an attic, it should be air sealed, especially in cold climates where warm air that rises into the attic can cause heat loss and create moisture problems. Air sealing is the practice of using expanding foam to seal up cracks, crevices and connections where walls, plumbing stacks, electrical wires and chimneys penetrate the attic. This keeps the rooms below from leaking expensively heated air into the attic. Though some do-it-yourselfers can tackle this, it’s generally best to have it done by a professional.
To calculate how much insulation you need, you will have to take into account: the area of your house, your local climate, how much pre-existing insulation you have (if any), and the type of insulation you have or would like to install.
Follow the steps below to calculate how much insulation you will need to add to areas that already have some type of insulation:
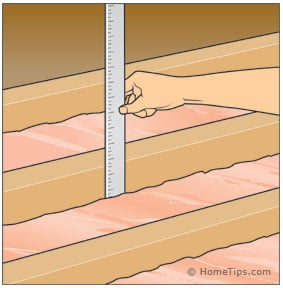
1 To check for and measure insulation in a wall, turn off the electricity to your home, unscrew an electrical outlet cover, and insert a hanger into the open space. Use this probe to measure the depth of your insulation as well as to pull out and inspect the type of insulation you have (you may need to fashion your hanger into a slight hook to remove some material). You can drill a small hole into areas without an accessible outlet cover (such as between a floor and ceiling) to obtain your measurements. In an unfinished attic, merely slip a ruler between a floor joist and the existing insulation to figure out the depth of the material.
2 Next, multiply the depth of your existing insulation (in inches) by the R-value per inch for the type of insulation that you have; you can check with your home improvement retailer if you are unsure about the R-value per inch of your material. The resulting number is the total R-value of your existing insulation.
3 Now, subtract the total R-value of your existing insulation from the ideal R-value you wish to achieve. This difference represents how much R-value you will need to add to attain the recommended value.
4 Finally, divide this number by the R-value per inch of the insulation you plan to install. This figure tells you how many inches of additional insulation you will need.
Inspecting Home Insulation
If the insulation in your home does not meet minimum levels, this could account for a huge amount of your energy loss. If you own an older home, it is likely that your insulation is insufficient, even though it may have met recommendations at the time it was installed.
Start your inspection from the top down.
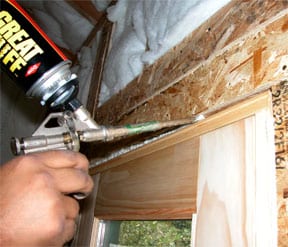
First, make sure the attic hatch closes tightly and is weatherstripped. In the attic, make sure penetrations for pipes, ductwork, and chimneys are sealed with expanding foam caulk and that electrical boxes for any light fixtures below are sealed with a flexible caulk.
Next, check the insulation itself to see if there is a vapor barrier. It could be tar paper, plastic, or kraft paper. If there does not appear to be a vapor barrier, you can replace the insulation or paint the ceiling with vapor barrier paint. A vapor barrier or vapor barrier paint inhibits moisture from passing through the ceiling, thereby preventing moisture damage and retaining the integrity of the insulation.
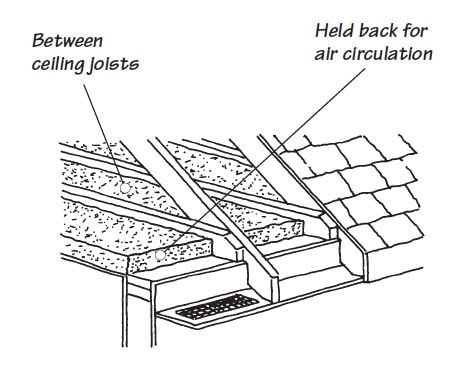
Last but not least, make sure that the insulation is not blocking air circulation through the attic vents—be sure to check the eaves vents.
To check your walls’ insulation levels, do one wall at a time, turning off the electrical power to any outlets along that wall. Once you are certain the power is off (test the outlets to make sure they are not “hot”), remove a cover plate and look for insulation around the perimeter of the electrical box. If necessary, gently insert a screwdriver inside the wall—see if it’s met with some resistance by insulation in that wall.
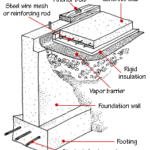
To check an unheated basement, look for insulation under the flooring above. If it is a heated basement, check the walls as you did with the upper floor.
Basic Insulating Practices
If you’re adding more to existing insulation, it isn’t necessary to use the same material. It’s okay to blow loose-fill insulation on top of fiberglass batts or to place fiberglass batts over loose-fill.
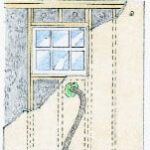
If you intend to install batt or blanket fiberglass insulation, note that you can buy it with or without an attached foil or paper facing (vapor barrier). When you’re insulating a previously un-insulated attic, buy the type with a facing and position this facing toward the warm-in-winter side (against the ceiling below). When you’re adding more to existing insulation, however, buy un-faced insulation or use loose-fill insulation, which doesn’t have a vapor barrier.
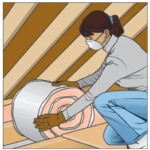
In an unfinished attic, insulation is installed between the ceiling joists of the room beneath the attic (the attic’s “floor” joists). When adding more batt or blanket insulation to an attic with existing insulation, the conventional wisdom is to orient the new batts perpendicular to the joists.
Be aware, however, that doing this will make it much harder to identify where you can safely stand or kneel because you won’t be able to see the joists once they are covered. So start at the outer perimeter and work your way toward the attic hatch. Place and fasten planks or plywood, supported by joists at both ends, where needed for safely accessing and working in the attic.
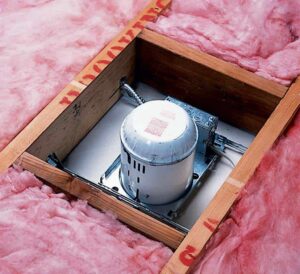
Do not install insulation over the eaves vents—this will interrupt proper attic ventilation. Also, to avoid causing a fire hazard, never place insulation over recessed light fixtures unless the fixtures have an IC (Insulated Ceiling) rating. Use wire mesh to hold back insulation if necessary. Last but not least, insulate and seal the attic access panel.
Part of this article, written by HomeTips’s Don Vandervort, was originally posted at USNews.com