Expert step-by-step instructions on building a wall, with diagrams, tips for framing with wall studs, and more DIY help

TOOLS AND MATERIALS REQUIRED
| Materials Required | 2×4 lumber for the framing, drywall or other wall covering material, nails and screws |
| Tools | Carpentry tools such as hammer or drill, level, plumb bob, tape measure, saw, combination square, power circular saw, 4-foot level, framing nailer, pancake air compressor |
Building an interior wall can be a great way to add privacy and functionality to a space. Whether you want to divide a large room into two smaller ones or create a separate space for storage or other purposes, building a non-bearing “partition” wall can be a relatively simple process. In this article, we’ll outline the basic steps involved in building an interior wall that has 2-by-4 wall studs and is meant to be covered with drywall panels.

Building a nonbearing interior wall requires basic carpentry skills, tools, and materials such as:
- 2×4 lumber for the framing
- Drywall or other wall covering material
- Nails and screws
- Hammer or drill
- Level
- Plumb bob
- Tape measure
- Saw
In preparation, you’ll need to first find the location of framing in the ceiling above your new wall’s location. Unless the new wall runs perpendicular to joists (as shown in Step 3 below) or you plan the wall directly beneath a joist, you will have to remove some of the ceiling surface material to install nailing blocks between the framing pieces for secure connection.
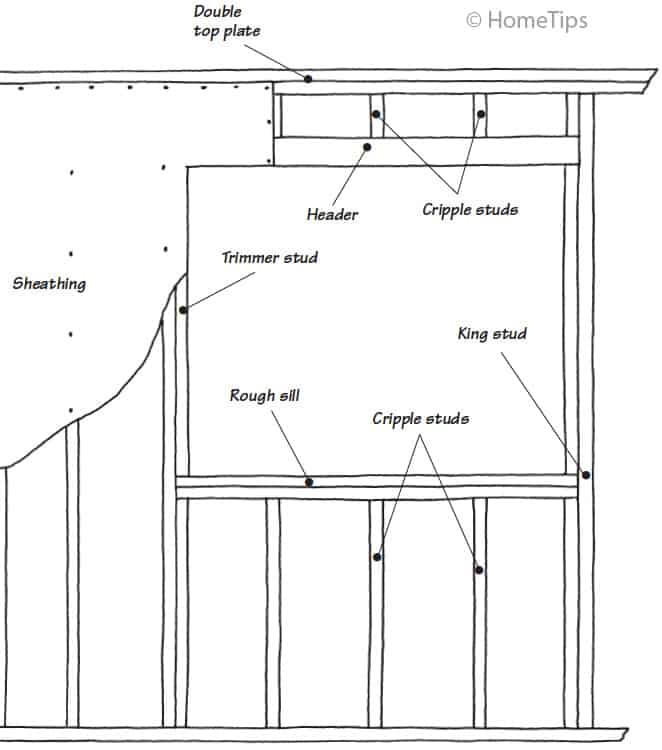
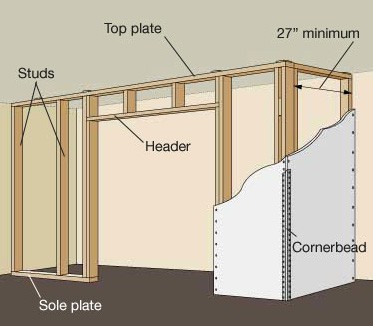
As shown in the illustration above, an interior wall has vertical 2-by-4 studs that stand between horizontal 2-by-4 base and top plates (or 2-by-6 framing if the wall will contain plumbing). The framework is usually covered with drywall (see How to Hang Drywall). If this looks like the work will be beyond your skills or if you don’t have the necessary tools, hire a framing contractor or carpenter to do the work.
Browse Tools for This Project on Amazon
• Combination Squares
• Power Circular Saws
• 4-Foot Levels
• Drywall Tools
• Framing Nailers
• Pancake Air Compressors
1. Determine the location and size of the wall
Start by determining the wall’s size and location. Establish the new wall’s center line across the ceiling, and then measure and mark 1 3/4 inch over from that line (half of a 2-by-4 top plate’s actual width) in one direction at both ends of your center line. Snap a chalk line between these marks to mark one edge of the top plate’s position.
Next, measure the length of the wall and cut two straight 2-by-4s to that length—one each for the top and bottom plates.
2. Lay out the wall stud locations
Lay the top and bottom plates side by side on the floor and mark them both at once, using a combination square as shown, so stud locations will be identical on the top and bottom plates. Mark for one stud at each end. Then, starting from the end that will meet a wall (if there is one) measure 15 1/4 inches to mark the inside edge of the next stud. From there, measure and mark every 16 inches to locate the same edge of each additional stud.

3. Fasten the top plate to the ceiling
In the illustration below, we show the ceiling drywall removed for clarity—and this shows a ceiling where the wall runs perpendicular to the joists. If your new wall will run parallel to the joists and it doesn’t fall directly below a joist, you’ll need to cut away some of the drywall for access and then install 2-by-4 nailing blocks between the joists.
With a helper, hold the top plate in position along the ceiling guideline. Nail through the top plate and the ceiling material and into the ceiling framing with two 3 1/2-inch nails—one at each end. Check its alignment, and then add more nails to securely hold it there (two per perpendicular joist or every 24 inches along a parallel joist).

4. Position and secure the bottom plate
Hang a plumb bob from the top plate as shown below to mark the bottom plate’s position directly beneath it on the floor—mark both ends and the approximate middle. Then snap a chalk line on the floor between the end marks. Run the top plate along this line and double check that all the stud marks match up, using the plumb bob. Nail the bottom plate to the floor with 3-inch nails, staggering and spacing them every 16 inches (for masonry or tile floors, you’ll need to use masonry fasteners instead).

5. Install the wall studs
Be aware that the distance from the bottom plate to the top plate may vary, especially if your floor isn’t quite level. With this in mind, it pays to measure for wall studs one-by-one as you install them. In other words, measure and cut the first one, and then install it. Then move on to the next one. Align each stud with its marks on the top and bottom plates. Check for “plumb” using a carpenter’s level, and then toenail (at a diagonal angle) each stud to both the top and bottom plate with 2 1/2-inch nails, or go the easier route and use brackets like the one shown below.

6. Form the connections and corners
Where one wall butts into another, you’ll need to add more wall studs and blocking, as shown here, to provide backing for drywall. If the wall will have an outside corner, install two full-length studs with blocks sandwiched in between. The idea here is that every edge of drywall will need backing to support it.

NEXT SEE:
• How to Cut Drywall
• How to Hang Drywall
• Soundproofing Walls & Ceilings
• How to Panel a Wall
How to Build an Interior Wall FAQs
- How to build a wall for beginners?
Building an interior wall involves determining the wall’s location and size, laying out the wall stud locations, fastening the top plate to the ceiling, positioning and securing the bottom plate, installing the wall studs, and forming the connections and corners. This process requires basic carpentry skills and tools such as a hammer, level, plumb bob, tape measure, saw, and nails.
- Can I build my own interior wall?
Yes, you can build your own interior wall if you have basic carpentry skills and the necessary tools and materials. The process involves framing the wall with 2-by-4 lumber, covering it with drywall, and ensuring proper alignment and stability.
- How to construct an internal wall?
Constructing an internal wall involves several steps: determining the location and size of the wall, laying out the wall stud locations on the top and bottom plates, fastening the top plate to the ceiling joists, positioning and securing the bottom plate to the floor, and installing vertical wall studs between the plates.
- Can you build a wall from the inside?
Yes, you can build a wall from the inside of a room. The process includes marking and cutting the top and bottom plates, securing them to the ceiling and floor, and then installing the vertical studs. It is important to ensure that all studs are plumb and properly aligned.
- How much does it cost to build a wall inside a room?
The cost to build a wall inside a room can vary depending on the materials used, the size of the wall, and labor costs if you hire a professional. Basic materials include 2-by-4 lumber, drywall, nails, and screws. Additional costs may include tools and fasteners if you do not already have them.
- How much does it cost to build a new internal wall?
Building a new internal wall involves costs related to materials (such as 2×4 lumber and drywall) and tools (such as a hammer, level, and saw). Hiring a professional for framing and drywall installation will typically cost $20 to $30 per linear foot for a finished wall, including framing, drywall, and electrical work. The total cost can range from $1,000 to $5,000 or more. The cost of materials alone can range from $7 to $16 per square foot for basic framing and drywall.
- Do you need footings for internal walls?
Non-load-bearing interior walls do not require footings. They are typically built on top of the existing floor structure and secured to the floor and ceiling joists.