Step-by-step instructions for how to open up a wall, and mount and finish a pre-hung window.

Many windows are sold “pre-hung,” meaning they come assembled with frames. Because you install the entire unit, installation of pre-hung windows is far easier than the method of building a frame and installing a window in it.
The task does require moderate carpentry skills and materials. If you do not feel confident about tackling this job on your own, call in a qualified window installer.
Following are general instructions for how to install a pre-hung window. Directions will vary slightly from product to product, so always read your manufacturer’s instructions before beginning.
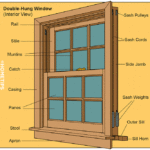
Also note: You will need to open up the interior side of the wall and rough frame an opening where the window will go. This rough framing will include extra wall studs on each side, a doubled 2-by-4 sill, and a header over the window, as discussed in depth in Wall Framing for a Window.


Below are the steps for installing a new window in a newly-framed rough opening.
To gain an overview of this job, here is a pretty helpful video that shows a similar project. Some of the steps are a little different than the ones we show in the photos below, but the principles are basically the same. The primary differences are with how the moisture seal is applied because the video shows working with an opening where the siding has been removed beyond the trim.
Preparing a Rough Opening
1. From inside the house, drive nails through the wall to mark the corners of the window. Then, outside, outline the opening for the window.
2. Cut through the siding and the sheathing with a power saw, making sure to use the correct blade. Place the window up to the opening and check for fit. Continue trimming if necessary.

3. Place the window into the opening to verify that it will fit. Be sure to make the opening slightly larger than the actual window. Check the manufacturer’s instructions to see exactly how much space you should leave. Cut through the siding and drywall again, if necessary, to provide ample space.
4. Line the opening with 8-inch-wide strips of moisture seal and tuck them into the siding. Slit the corners of the moisture seal diagonally with a utility knife, and fold the pieces toward the interior. Trim the strips if necessary until they extend just inside the interior edge of the opening. Then staple them, working from the bottom up.

5. At this point, put two small 1/2-inch spacers at the bottom of the opening, about 1/2 inch in from the sides. Check for level, and add shims if needed.
Use dabs of silicone or two 6d (2-inch) nails per pair of shims to affix them to the opening (if you use nails, pre-drill nail holes). After they are secured, cut them so they are flush with the siding.

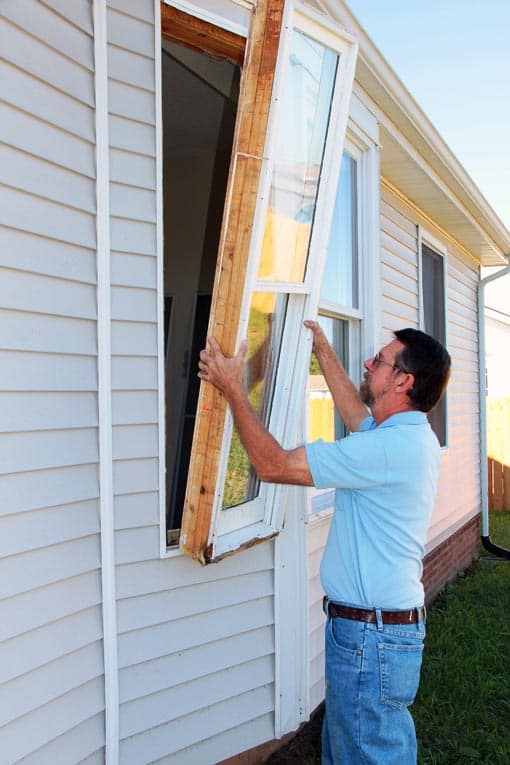
After preparing the opening for a new window (see How to Install a Window), it’s time to actually mount the window. Here are the steps to follow:
Mounting a Window
From outside the house, rest the bottom of the window on the spacers, and then slowly push the top into the opening. Be sure it is right-side up—it may have drain holes at the bottom that allow moisture to drain.
Drive a nail partway through the trim at one of the upper corners. Check that the window is level, make any necessary adjustments to the shims, and then finish driving the nail. Re-check the level.
Then go inside and make sure everything looks okay from that side.
Drive nails at the other corners and then around the perimeter.

Insert shims along the sides near the top and bottom of the window and at the midpoint, and adjust them as needed until the window is plumb. Check to make sure the window is operational, and then secure the window to the opening by driving nails into the brick mold or casing. Apply flashing and sealant (outside and inside) according to the manufacturer’s instructions.
Finishing a Window
Affix the trim on the outside, and caulk the space between the window and the siding, according to the manufacturer’s directions.
On the inside, check the window for level and add shims around the sides until the window is snug in the opening.
Using 8d (2 1/2-inch) finishing nails, nail through the jamb and the shims into the trimmer studs; use a nailset to set the nailheads just below the surface. Add insulation between the jambs and the trimmer studs, cut the shims so they are flush with the wall, and then affix the interior trim.
Inside, you can apply molding to complete your project: a stool, apron, and side casings for single- or double-hung windows.
Installing a Window In New Construction
Installing a window in new construction is easier than putting one in an existing wall, thanks to the fact that you don’t have deal with interior wallboard, exterior siding, existing trim, and the like.
Here is an excellent video from This Old House on the right way to do this job:
![]()
![]()