The most familiar enhanced-control device, the dimmer switch lets you lower or raise light levels so that they’re appropriate to the need. For example, a bathroom dimmer can be set low for restful light when bathing and then raised to higher intensity for shaving or makeup application.

In a child’s bedroom, a dimmer can provide low-level light at night for reassurance or for a parent’s nighttime checks and then fill the room with light for daytime play. Likewise, a family room can be lit with low-level lighting for relaxed entertaining and then perked up with full lighting for family activities.
Overview of Dimmer Switches
Most dimmers today are solid-state devices. They actually switch off and on very rapidly—120 times per second. Because the human eye perceives the overall light emitted, the brightness of light delivered is actually a product of how long the current is in the “off” and “on” cycles.

Dimmers save money in two ways. First, they significantly save energy by using only the amount of electricity needed. When a light is dimmed by 25%, a dimmer saves about 20% of the electricity required. When dimmed by 50%, it saves 40% of the electricity. Second, a dimmer greatly extends bulb life because it reduces the strain on the filament. When dimmed by 25%, a lamp lasts four times as long as it would at full power; dimmed by 50%, it will last as much as 20 times longer.
No special wiring is needed for a dimmer—it may replace any conventional light switch. You must buy specially rated dimmers for fluorescent, compact fluorescent, halogen, LED or low-voltage lighting and fans. Any dimmer you buy should be rated to handle the type and total load of fixtures it will control. Also note that a dimmer installed to operate a fixture with a three-way socket will only be able to operate one of the light settings.
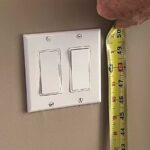
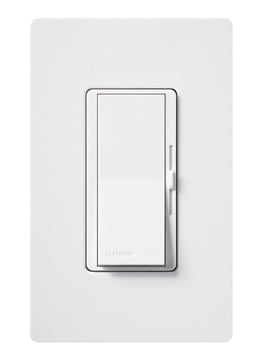
Dimmers may be operated with a toggle, a dial, a slide, a paddle switch, a touchpad, or an electronic button; some types integrate two or more of these methods to handle different tasks. Whether to choose a toggle, rotary dial, or slide switch is really a matter of personal preference; focus instead on the range of control and the features. Does it offer full-range dimming? Can it be pre-set to specific light levels? How many levels? Is it easy to use?
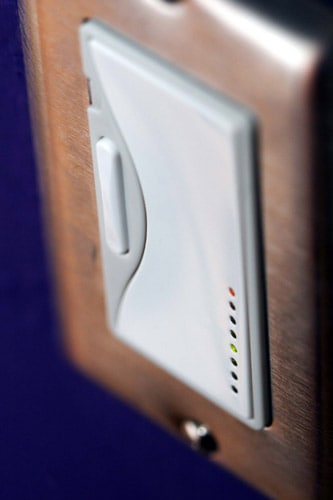
Of course, the more features a dimmer has, the more expensive it generally will be. The idea is to figure out how it will be used and then tailor your choice to the need. For example, for general dimming applications, you might want to choose a multi-function dimmer like Lutron’s Maestro, which has a touch-switch control that will recall a pre-set light level if you touch it once or turn the lights all the way on if you touch it twice. Small LEDs along one edge show the level of light, and it can be adjusted to fade to “off” very slowly, allowing you enough time to leave the room.
How to Install a Dimmer Switch (Step-by-Step)
This helpful tutorial covers how to install dimmer switches, so you can take control over how your interior and exterior spaces are lit.
A dimmer switch is great for taking control over the way a room is lit. It gives you the ability to make subtle changes in light levels—to set the mood in a dining room, lower the levels in a child’s room, or even give you flexibility with outdoor lighting.
In addition to these aesthetic benefits, a dimmer also has a couple of important, practical pluses. First, a dimmer saves energy by allowing you to tailor electricity usage very precisely, eliminating waste. It also extends the life of most lightbulbs because it minimizes or eliminates the “filament shock” when you flip on a conventional light switch.
Replacing a conventional light switch with a dimmer switch is a relatively simple task, even if you’re only a moderately experienced do-it-yourselfer. (Note: If you intend to use fluorescent or LED bulbs in the lighting circuit, you will need a dimmer rated for fluorescent or LED.) To buy dimmers, see Dimmer Switches on Amazon.
A dimmer switch can cause a lightbulb’s filament to vibrate, creating a buzzing sound when the light is on a less-than-full setting. You can buy a new dimmer that’s designed not to buzz and replace the switch, but before you do try replacing the bulb with a “long life” lightbulb that has a sturdier filament and is rated 130 volts instead of the far more common 120 volts.
Just remember the cardinal rule: Always shut off the power to an electrical circuit before working on it. Turn off the circuit breaker at the electric service panel, and then refer to the following step-by-step procedures:
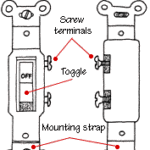
1 Use a screwdriver to remove the wall plate. Then unscrew the switch mounting screws.

2 Grasp the switch by its flanges and gently pull it straight out of the mounting box. With a non-contact circuit tester, double check to make sure the circuit wires are not electrically charged.

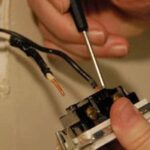
3 Unscrew the wires from the switch terminals. If they are poked into holes in the back of the switch, use a small screwdriver to release them. Straighten the ends of the wires, or, if possible, snip them off and strip the ends again.

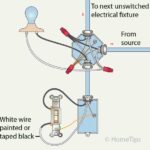
4 Use lineman’s pliers to twist the bare end of the green ground wire together with the bare copper ground wire in the box. Then use a wire nut to further connect the dimmer’s ground wire to the circuit’s bare copper or green ground wire.

5 Connect one of the dimmer’s black wires to each of the two black wires in the box using wire nuts.

6 Make sure the connections are tight, and then carefully push the wires into the box, leaving room for the dimmer. Position the dimmer, and screw it to the mounting holes in the box.

7 Replace the faceplate. Turn the power back on at the electrical panel, and then try out the switch.