This guide explains how to wire a standard single-pole light switch safely, including common switch wiring configurations, step-by-step instructions, troubleshooting tips, and updated wiring diagrams.
Quick Answer
Before You Start
How a Light Switch Works
Standard Single-Pole Switch Wiring
How to Wire a Light Switch Step-by-Step
Common Wiring Configurations
How to Wire a Dimmer Switch
Three-Way Switches
Common Wiring Mistakes
FAQs
A standard single-pole light switch is the most common wall switch found in homes. It controls a light fixture from one location by interrupting the flow of electricity on the circuit’s hot wire.
Though light-switch wiring is usually straightforward, mistakes can create serious safety hazards—including shocks, damaged fixtures, or fire risk.
This guide explains the most common single-pole switch wiring methods and shows how the wires connect in real-world installations.
Quick Answer
To wire a standard single-pole light switch, turn off the circuit breaker, connect the incoming hot wire to one brass terminal, connect the outgoing switched-hot wire to the other brass terminal, attach the ground wire to the green screw, then reinstall the switch and restore power.
This is the wiring configuration most homeowners encounter when replacing or troubleshooting a standard wall switch.
The incoming hot wire brings power to the switch, and the outgoing switched-hot wire carries power to the light fixture when the switch is turned on.

Don’s Advice
If you remove an old switch and the wires aren’t clearly identified, take a photo before disconnecting anything.
Even simple switch boxes can contain multiple cables, feed-through wiring, or converted white wires that can become confusing once disconnected.
Before You Start
Electrical work should always begin with proper safety precautions.
Electrical Safety Warning:
Always turn off power at the breaker panel before removing a switch, handling wires, or opening an electrical box. Use a non-contact voltage tester to verify that power is actually off before touching any wiring.
See also: How to Turn Off Your Home’s Electricity
Before beginning, gather:
- Voltage tester
- Screwdrivers
- Wire stripper
- Needle-nose pliers
- Electrical tape
- Replacement switch if needed
How a Light Switch Works
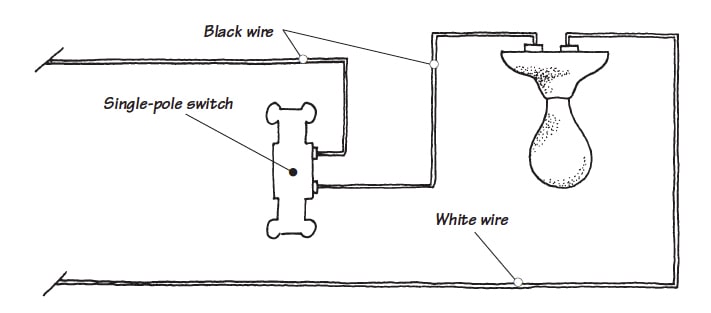
A standard single-pole switch interrupts the circuit’s hot wire.
When the switch is ON:
- Electricity flows through the switch to the light fixture
When the switch is OFF:
- The switch breaks the circuit and stops current flow
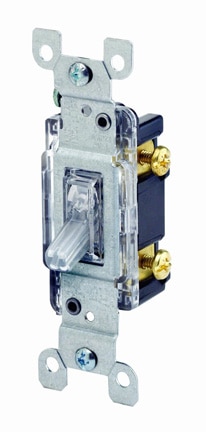
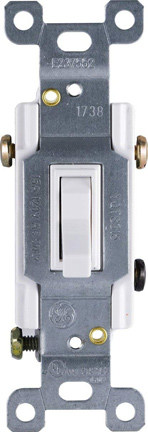
A standard single-pole switch has:
- Two brass terminal screws
- One green grounding screw
One black wire brings power into the switch. The other carries switched power to the light fixture.
Standard Single-Pole Switch Wiring
In the most common setup:
- The incoming hot wire connects to one brass screw
- The outgoing switched-hot wire connects to the other brass screw
- The bare copper or green ground wire connects to the green grounding screw
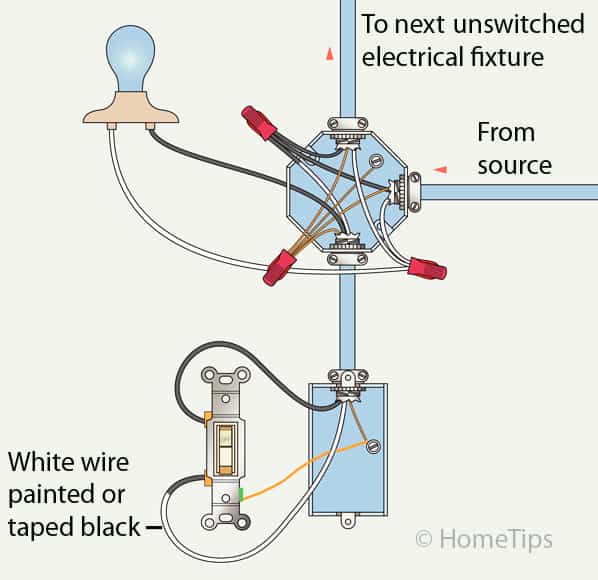
The white neutral wires normally bypass the switch entirely and remain connected together with a wire connector inside the electrical box.
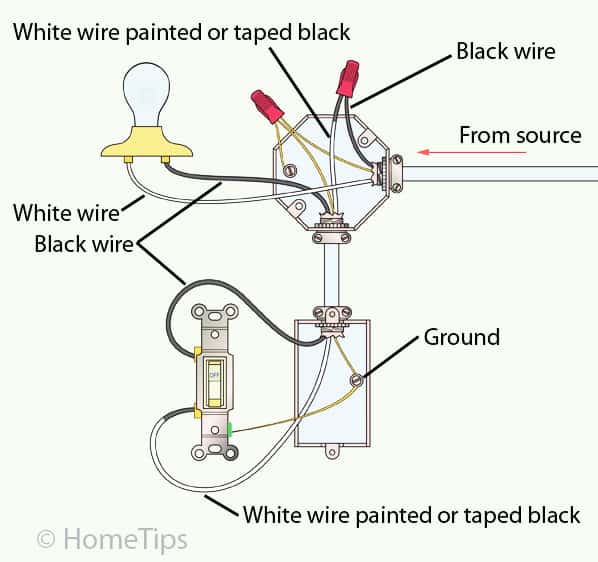
However, in some switch loops, a white wire may be repurposed as a hot wire. Electrical code requires this white wire to be re-identified with black tape or marker.
Important:
A white wire connected to a switch is not always a neutral wire. In older switch loops, white wires are sometimes used as hot conductors and should be marked with black tape or black paint to indicate that they’re serving as black wires.
How to Wire a Light Switch Step-by-Step
1. Turn Off Power
Turn off the breaker controlling the circuit.
Use a voltage tester to verify the wires are dead before touching them.
2. Remove the Old Switch
Remove the cover plate and mounting screws.
Carefully pull the switch outward to expose the wiring.
Take a photo before disconnecting wires.
3. Identify the Wires
Typical wires include:
- Black hot wire from the panel
- Black switched-hot wire to the fixture
- White neutral wires
- Bare copper or green ground wire
Do not disconnect neutral wire bundles unless necessary.
4. Connect the Hot Wires
Attach one black wire to each brass terminal screw.
Either brass terminal can usually serve as line or load on a standard single-pole switch.
Tighten terminal screws securely.
5. Connect the Ground Wire
Attach the bare copper or green wire to the green grounding screw.
Grounding protects against shock hazards.
6. Fold the Wires Carefully
Neatly fold the wires back into the electrical box.
Avoid sharply bending or pinching wires.
7. Secure the Switch
Screw the switch into the box and reinstall the cover plate.
8. Restore Power & Test
Turn the breaker back on and test the switch operation.
Common Wiring Configurations
The exact wiring arrangement depends on where the switch sits relative to the light fixture and power source.
Switch at End of Circuit
Light at center of circuit. The power feed goes first to the light fixture and then to the switch.
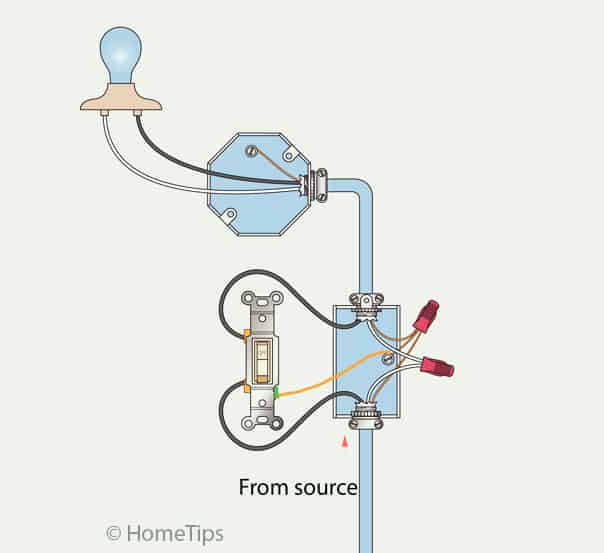
Switch Mid-Circuit
Switch controls one light while power continues to additional fixtures.
Homes built during different eras may use different wiring methods, especially in older switch loops.
How to Wire a Dimmer Switch
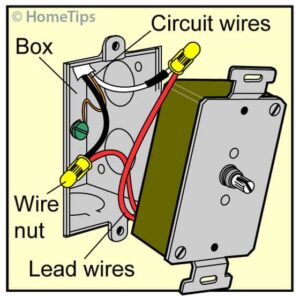
Most dimmer switches wire similarly to standard switches, but many dimmers use pre-attached leads instead of terminal screws.
Typically:
- One dimmer lead connects to incoming hot
- The other connects to the switched-hot wire going to the light
- The green wire connects to ground
Dimmer switches often use wire leads instead of screw terminals.
See also: How to Install a Dimmer Switch
Three-Way Switches
A three-way switch controls a light from two locations, such as:
- Hallways
- Staircases
- Large rooms with multiple entrances
Three-way switches are more complex because they use traveler wires and an additional terminal.
See:
How to Wire Three-Way Switches
How to Wire 4-Way Switches
Common Wiring Mistakes
Typical DIY switch-wiring mistakes include:
- Working on live circuits
- Misidentifying white wires
- Loose terminal connections
- Failing to connect the ground wire
- Using backstab connections instead of screw terminals
- Overcrowding electrical boxes
Don’s Advice
Whenever possible, use the switch’s side screw terminals instead of push-in “backstab” connections.
Side terminals generally provide a tighter, more durable connection over the long term.
Need Professional Help?
If your wiring doesn’t match standard diagrams, the box contains multiple cables, aluminum wiring, or you’re unsure which wire is hot, it’s safest to call a licensed electrician.
Find a trusted local electrician for switch installation or troubleshooting.
FAQs
What wires connect to a single-pole switch?
Typically one incoming hot wire and one outgoing switched-hot wire connect to the brass terminals, plus a ground wire to the green screw.
Does it matter which black wire goes on which terminal?
On most standard single-pole switches, either brass terminal can accept the incoming or outgoing hot wire.
Why does my switch have a white wire connected?
In some switch loops, the white wire is repurposed as a hot conductor and should be marked with black tape or paint.
Can I replace a standard switch with a dimmer?
Usually yes, provided the dimmer is compatible with the fixture and bulb type.
What happens if switch wires are reversed?
On a standard single-pole switch, reversing the two hot wires usually does not affect operation.