How to wire a pair of three-way switches to turn lights on and off from both ends of a hallway or the top and bottom of a staircase. Includes 3-way switch wiring diagrams for several situations.

A pair of three-way light switches control one or more light fixtures from two switch locations, such as from both ends of a staircase or hallway.
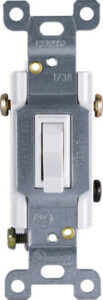
Wiring a three-way switch can be confusing because this type of switch is built (and wired) different from a conventional (“single-pole”) light switch. For starters, it doesn’t have “OFF” and “ON” printed on the toggle like a single-pole switch, and it doesn’t have a top or bottom—it can be mounted with either end up. It also has one extra terminal (the screw that you hook wires onto). Instead of having two terminal screws and a ground screw like a regular single-pole light switch, a three-way switch has three terminal screws plus a ground screw.
Quick tip: If you want to control lights from more than two locations, you combine two 3-way switches with a 4-way switch. See: How to Wire a Four-Way Switch
Note: Many contemporary switches have holes for plugging-in the wires instead of screws for locking the wires in place, but the principles are the same.
On most 3-way switches, two of the terminals are the same color (typically silver or brass), and the third terminal, called a “common terminal,” is a different, often darker, color.
Not all three-way switches have these terminals placed in the same configuration, so you have to pay attention to the terminal screw colors (and the instructions that come with the package) when wiring a 3-way switch (or a pair of them). Unfortunately, they are not standardized. For example, the switch shown below has one silver and one gold screw opposite one another and a bronze screw in the third position, and a green screw at the bottom end that’s for attaching the ground (green or bare) wire. Some 3-way switches have different terminal layouts.
When replacing an existing three-way light switch, be sure to return the wires to the proper screw terminals. To do this, put a piece of electrical tape on the wire that goes to the “common” (third) terminal screw. The other two wires can attach to either of the paired terminals. For clarity, study the illustrations below.
Note that the diagrams below assume that you’re following all recommended practices for safe installation of electrical circuits.
Always turn off the power to the electrical circuit before working with exposed electrical wires.
How a 3-Way Switch Works
It’s important to recognize that a light switch—when it’s turned off—is designed to interrupt the “hot” wire that goes from the power source to the fixture.
The white wire from the power source always goes uninterrupted to the light fixture and the bare grounding wires are always fastened to grounding screws. But the “hot” or “charged” (usually black) wire coming from the power source connects to the switches.
With a three-way switch, three wires connect the pair of switches—two black “traveler” wires and a third “common” wire.
When the circuit’s power is turned on, any of these may be “hot,” depending upon how the switches are toggled.
Because “3-wire-with-ground” nonmetallic electrical cable such as Romex is often used to wire switches, a slight modification is often made during installation. This type of cable contains a white wire that needs to serve as a black wire. For this reason, the white wire is painted or taped black to identify it as a black (hot) wire when the cable is used to connect two three-way switches and lights.
How to Wire 3-Way Switches
There are three basic ways three-way switches may be set up to control one or more ceiling lights. The right one for you will depend upon where the power enters the circuit (at one of the switches or at the light fixture), and the placement of the switches and lights.
Please note: All switches that have a green grounding screw or wire must be connected to the metal electrical box or to the circuit’s bare or green ground wire.
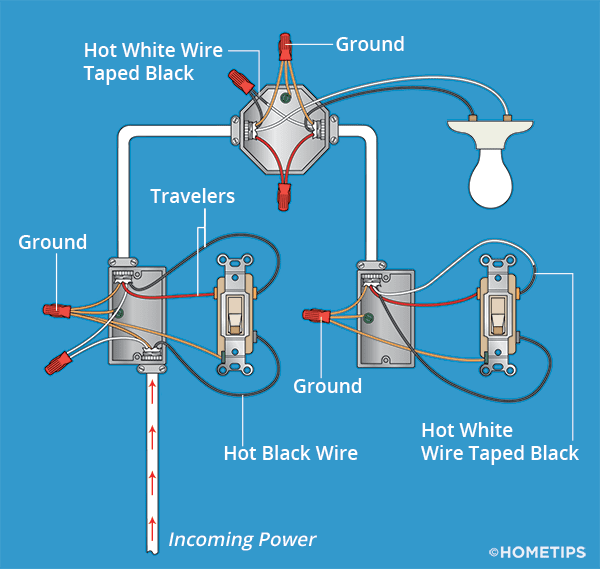
A) The wires from the power source may enter one switch box first, then travel to the light, and then terminate at the other switch. Note in this illustration that the inbound white wire travels through the first switch box and terminates at the light fixture.
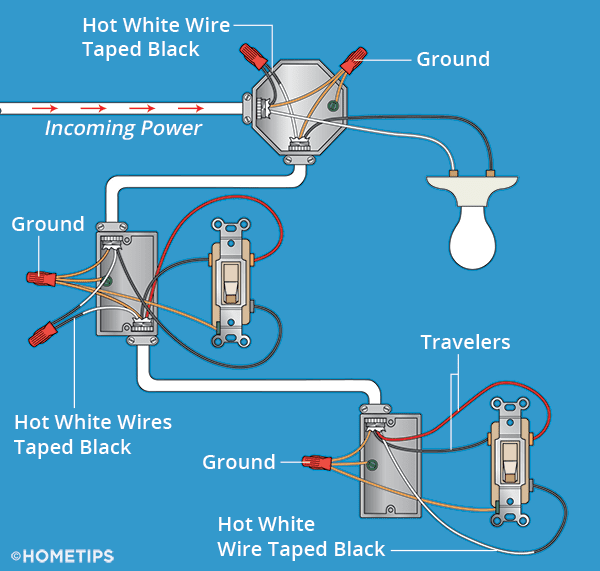
B) The wires from the power source may enter the light fixture box first, travel from there to one switch, and then connect that switch to the other switch. In this configuration, the inbound white wire connects directly to the light fixture. The black wire connects to a taped white wire that passes through the first switch box and connects to the common terminal on the second switch. Red and black travelers then connect the paired traveler terminals on both switches.
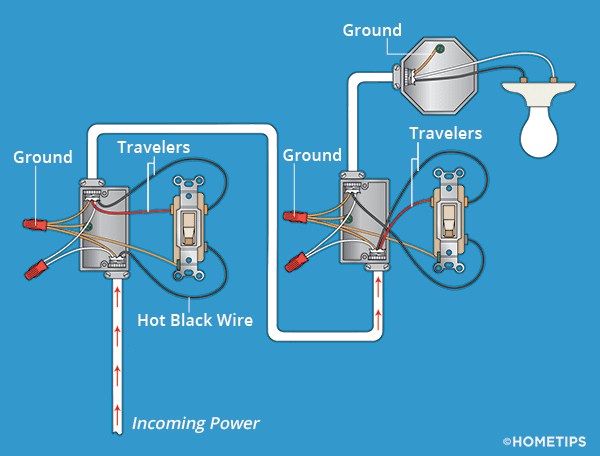
C) The wires from the power source go from switch to switch, and then go to the light. In this configuration, the power enters the first switch, and the light fixture is placed after the second switch.
The white wire, connected by wire nuts in each switch box, is continuous from the source to the light fixture. The charged black wire connects to the common terminal of the first switch and is then carried by paired travelers to the paired terminals of the second switch. The common terminal of the second switch sends the black wire to the light fixture.