An expert step-by-step guide for applying mottled decorative paint finishes. Includes the best way to use a two-part roller for high quality mottling.

Mottling with a Two-Part Roller
Step-by-Step Mottled Painting
Mottling is a faux-finishing technique that aims to mimic the appearance of leather or parchment.
The basic idea is to first apply a base coat and then dab or swirl incomplete and irregular layers of colored glaze over it.
A mottled finish is easier than most faux finishes and so may be a good choice for a beginner.

If you mix light colors with dark, or choose paint colors that are very different from each other, the result will be lively and attention-grabbing.
Mixing slightly different hues of the same basic color will have a more subtle effect, giving walls a sense of depth and providing interesting shading.
Experiment on scrap pieces of drywall or plywood until you achieve the color combination and application technique that most pleases you. This is an important step; otherwise, you may be disappointed once you finish painting the entire room.
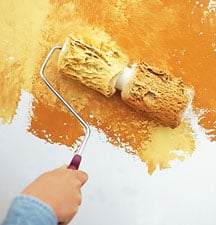
Once you have applied the base coat, you can apply the glaze(s) in a decorative way.
Or, you can apply an even coat of glaze and then use a tool to partially pull it off to create texture. You may work by dabbing with a sponge, swirling with a standard brush or a special faux- finish brush, dragging or rolling a glaze-soaked rag across the surface, or even tapping with a feather duster.
Aim for a consistent look throughout the room.
Glaze dries slower than paint, but you don’t have a great deal of time, so get your technique down before you start. Work in irregularly shaped sections about 4 feet square. And work on succeeding sections before the preceding section has dried as applying new glaze to dried glaze will create an obvious overlap. Also, step back and examine the wall from time to time.