This guide will teach you how to attach interior trim, a necessary skill for many home improvement projects. Learn how to find walls studs and attach trim to walls and ceilings by hand nailing or using a power nailer.

Because trim boards are often thin and narrow, they must be anchored firmly or they could pull away from the wall or joints between trim pieces could develop noticeable gaps.
Finding Wall Studs
In most cases, trim should attach to wall studs, which are usually (but not always) spaced every 16 inches on center, meaning the center of one stud is 16 inches away from the center of the next stud.
In newer homes, studs are pretty consistently 16 inches on center, but at the ends of a wall at least one stud will be a shorter distance away from the end. In an older home, stud spacing may be surprisingly inconsistent, so you need to find each stud individually.
A stud is 1 1/2 inches thick. To ensure a good connection, don’t just find the stud, find the center of the stud. Otherwise, you may drive a nail into the stud’s edge, which will make for a weak attachment.
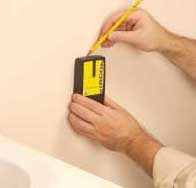
If the wall is drywall, a stud sensor (or stud finder) will reliably indicate stud positions.

Or, try rapping along the wall; when you hear a less hollow sound, you are probably rapping at a stud location.
Drive a test nail or screw-in a spot that will be covered by the trim piece-to make sure you’ve found the stud.
On an old lath-and-plaster wall a stud finder will be less reliable because there is wood lath nearly everywhere. Test-drive screws or nails to find the studs.
Hand Nailing
Use trim nails that will penetrate at least 1/2 inch into the studs. To choose the right-sized nail, add to that 1/2 inch the thickness of the drywall, usually 1/2inch, and the thickness of the trim board.


Standard finish nails usually work fine. However, many carpenters prefer to use galvanized finish nails. They hold a bit firmer because they have a slightly rough surface, and they resist rusting, which is occasionally a problem. If you want a very small hole, consider using “hard trim” nails, which are very thin.
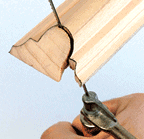
If you are driving a nail within 2 inches of the end of a board, drill a pilot hole first to ensure against splitting the board. Drill through the molding piece but not deeply into the stud or the nail may not hold tightly. The hole should be slightly narrower than the shank of the nail. In the middle of a board, pilot holes are usually not necessary.
If you miss the nail and hit the board instead, you will produce an unattractive “frown” or “smile” in the board. Practice nailing on scrap pieces until you feel proficient.

Pound the nail until its head is slightly above the surface of the board. Then hold the tip of a nail set against the nail head and tap with a hammer to drive the head about 1/8 inch below the surface of the wood. Once you have driven and set all the nails, go back and fill the holes with wood filler. Allow the filler to dry and then sand lightly.
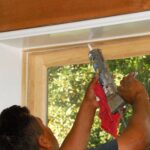
Using a Power Nailer
Fastening with a power nailer has great advantages over hand nailing. It goes much quicker, there is less chance of marring the wood (as often happens when you miss the nail with a hammer), you can hold the piece with one hand while you drive the nail with the other hand, and there is less chance of dislodging surrounding pieces with repeated blows of a hammer.

Power nailers are now fairly reasonably priced. A handyperson is usually best off buying a kit that includes two or three nailers and the compressor. For trim, you can use a nailer and/or a stapler. Short staples attach more firmly than short nails. Trim nails for power nailers are quite thin, so you may need to use more of them than you would if you were hand nailing.
The compressor will likely weigh about 45 pounds, but it will not be difficult to carry. You will need to plug in the compressor, attach the hoses, and wait for a minute or two while the compressor (noisily) builds up air pressure.
You can also buy nailers that do not use compressors but instead are powered by cartridges. These are typically more expensive, but you won’t have to schlep a compressor and hose around.