Expert advice on how to repair a refrigerator ice maker that doesn’t make ice or doesn’t work at all. Also helps you fix an ice maker that is frozen up or does not eject ice. Includes how to replace an ice maker.

Troubleshooting and repairing an ice maker are jobs that do-it-yourselfers can handle with a little bit of guidance.

The most common problem with an ice maker is that it doesn’t make ice. Other problems include an ice maker that won’t stop making ice or freezes up. Here we begin with the most common problem—the ice maker stops making ice.
How to troubleshoot an ice maker that isn’t making ice:
- Make sure the bail wire above the ice tray is in the down position. When it’s up, it shuts off the ice maker.
- Check the water supply line beneath or behind the refrigerator. Be sure it isn’t kinked and is supplying water.
- Be sure the little fill tube that fills the ice tray isn’t frozen. If it is, melt the icy tube with a hair dryer.
- Look for ice in the ice mold and make sure the motor that turns the ice ejection arm is working.
- Check the tap valve that connects the supply tube to the water pipe.
- Check the solenoid. For more detail about this and all of the above steps, see below.
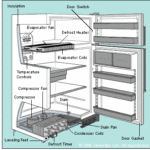
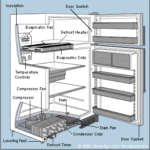
How An Ice Maker Works
But before diving into dealing with ice maker problems, let’s look at how an ice maker works so you’ll have a better understanding of what might be wrong.
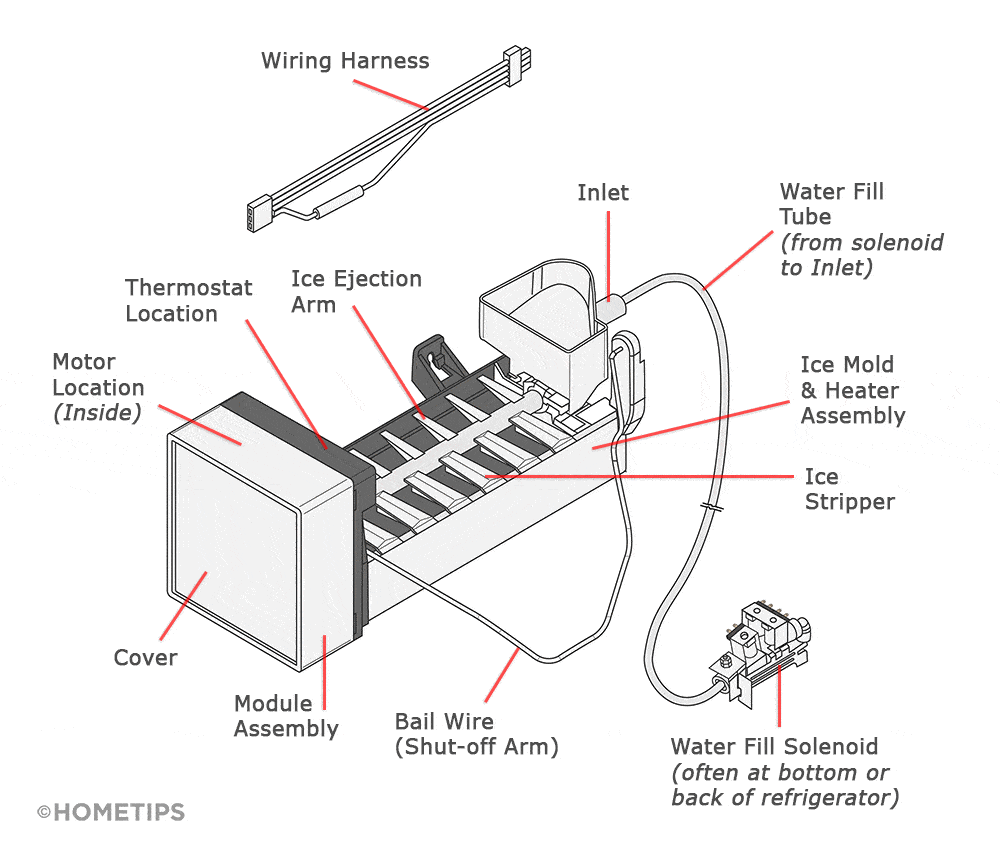
An ice maker receives water through a small, 1/4-inch water supply line that runs from the refrigerator to a water pipe (or a water filter).
The water supply line leads to the water fill valve in the refrigerator, which is controlled by an icemaker thermostat. The fill valve sends water through a fill tube into a mechanized ice maker assembly that includes an ice mold. This is where the water freezes. Browse replacement parts on Amazon.
When the water freezes, the thermostat shuts off the water supply via a solenoid. Next, it turns on a heater to slightly warm the cubes so they will release from the ice mold. Then it turns on a small icemaker motor that rotates the ice ejection arm. The ejection arm pushes the ice cubes out of the mold and into the ice collection bin. Consequently, the water fill valve turns on for a few seconds to fill up the ice mold again, and the cycle repeats.
When the ice collection bin is filled with ice, the ice raises a bail wire, shutting off the ice maker unit until the ice level in the bin drops.
Ice Maker Does Not Make Ice
If the water’s route is blocked or the solenoid doesn’t work—or if the bail wire is lifted—the ice maker won’t make ice. (Also note that your home’s water pressure may not be strong enough to serve an ice maker.)
Here are a few steps you can take to get your ice maker working.
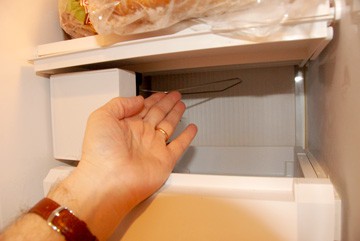
- Make sure the bail wire above the ice tray is in the down position. When it is locked in the upper position, it shuts off the ice maker.
- Check the water supply line. If the ice maker doesn’t make ice but you can see the arm swing into motion and you hear a buzz for about 10 seconds, the water valve is asking for water that isn’t arriving. This means the valve and the solenoid are probably okay, but the water supply is not.
Be sure the water supply line isn’t kinked behind or beneath the refrigerator (1/4-inch copper tubing is much better than plastic fill line to prevent kinks). Find the water shut-off valve behind the refrigerator or under the sink, turn it off, unscrew the copper line from the back of the refrigerator, put the copper line in a bucket, turn on the valve, and see if water pours out.

![]()
3 Check the tap valve. A bad tap valve—the little device that connects the ice maker’s water supply tube to the water pipe—may cause the problem where the ice maker’s supply tube connects to the water pipe.
If necessary, replace the inlet valve and the tap valve. For the tap valve, use the type that requires you to drill a 1/4-inch hole (as opposed to the “self-piercing” type). You can buy an ice maker connection kit and do this yourself, or call a repair person or plumber to install an inline water filter when replacing the valve.
4 Check the solenoid. The water line attaches to a solenoid at the back or bottom of the refrigerator and then travels to the ice maker. The solenoid may be defective or may not be receiving power.

Unplug the refrigerator first. Then you can try removing the sediment screen inside the solenoid and flushing it with water to clean it, and at the same time you can inspect any seals or diaphragms to ensure that they are sound. You can buy a replacement solenoid on Amazon for about $25—it’s held in place by 4 screws.
Here is a video that’s quite helpful for troubleshooting why an ice maker isn’t working:
Ice Maker Does Not Turn Off
If your ice maker doesn’t turn off (it keeps making ice) even when the ice bin is full:
- Lift the bail wire to shut off the ice maker, and remove the ice bin. Using a screwdriver if necessary, remove the ice maker, clean it thoroughly, and then reinstall it.
- If the problem persists, consider replacing the ice maker and valve. You can do this yourself, as discussed below, or have an appliance repair person do it. With this type of problem, you can have it repaired, but it’s often wiser, easier, and less expensive to replace the unit entirely.
Ice Maker Repair: Ice Maker Frozen Up
If your ice maker has frozen up, take the following steps to thaw it out:
- Unplug the refrigerator or turn off the circuit breaker that supplies power to it. Remove the ice bin from the refrigerator and remove any loose ice from the ice maker.
- Find the fill tube. This is a white rubber-like hose that delivers water to the ice maker. Pull down the small metal clip off the housing that holds the fill tube (though not all ice makers have this clip).
- Warm the hose and surrounding mechanism. To do this, you can train a hair dryer on the ice maker to melt any ice blocking the mechanism. But be very careful (sop up any dripping water with a rag) as electricity and water can present a serious risk of electrical shock. Also, be careful not to melt the plastic parts.
- If you don’t want to use a hair dryer, you can soak the supply tubing with hot water, using a turkey baster and catching the overflow in a bowl. In some cases, it may be easier to remove the ice maker than to thaw out the fill tube with the ice maker in place.
Ice Maker Does Not Eject Ice
If your ice maker is producing ice but does not properly eject it, the problem is with the motor assembly inside it.
You can buy an ice maker motor module on Amazon. Here is an easy-to-follow video on how to replace an ice maker motor:
About Ice Maker Replacement
If the problem isn’t solvable or the coating inside the ice maker mold is coming off on your ice cubes, you’ll need to replace the entire unit. You can find an assortment of replacements on Amazon.
Though the ice makers vary from one brand to another, most are similar in design. For Kitchenaid, Maytag, Kenmore, and Whirlpool refrigerators, see this video:
This also shows how to switch the bail arm wire from the old ice maker to the new one and how to change the wiring harness if necessary.

Note: When you install a new ice maker, it may take as long as 24 hours for it to begin working properly.
NEXT SEE:
• How to Clean Refrigerator Coils
• How a Refrigerator Works
• How to Buy a Used Refrigerator
• Refrigerator Troubleshooting & Repair
Featured Resource: Find a Local Pre-Screened Ice Maker Pro