Expert advice on how to inspect roofing from both inside and outside a house, including inspecting for roof leaks.

It’s a good idea to inspect and repair your roof in autumn, before the hard weather hits. Examine the roof again in spring to assess any winter damage. If you discover problems, make the necessary roofing repairs.
Inspect from Inside
Begin an inspection in the attic with a thin screwdriver, a knife, a piece of chalk, and a strong flashlight to examine the ridge beam, rafters, and sheathing. Look for water stains, dark-colored areas of wet wood, moisture, and soft spots that may indicate dry rot. Mark the wet spots with chalk.

Be very careful when in the attic that you step only on ceiling joists or other surfaces that are strong enough to support you. If you must remove insulation batts to examine the sheathing, be sure to wear gloves, goggles, a respirator, and loose clothing.
Next, turn off any lights. If you see any holes above you, drive nails or poke wire through them so they’ll be visible from the roof’s surface. (In a wood-shingle roof, shafts of light coming in at an angle indicate separations that may shut when the shingles are wet.)
Inspect from Outside
To check the roof structure, stand back from the house and look at the lines of the ridge and rafters. The ridge line should be perfectly horizontal, and the line of the rafters, which you can assess by looking along the plane of each roof section, should be straight. If either sags, call in a contractor—your house may have a structural problem.
Next, inspect the roof’s surface. If you’re at all nervous about going up on the roof, make the inspection from a ladder, using binoculars. Don’t walk on the roof any more than needed as you can cause more damage.
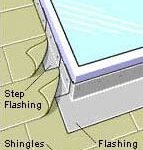
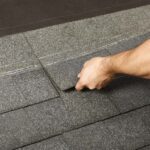
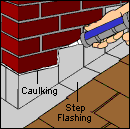
Inspect the flashing for corrosion and broken seals along the edges. If you have metal gutters and downspouts, look for rust spots and holes. Then examine the roof surface for signs of wear, loose or broken nails, or curled, broken, or missing shingles. Use a knife and screwdriver to test the boards along the eaves and rakes. If you encounter damage caused by dry rot, replace the boards and finish them to match the existing areas.
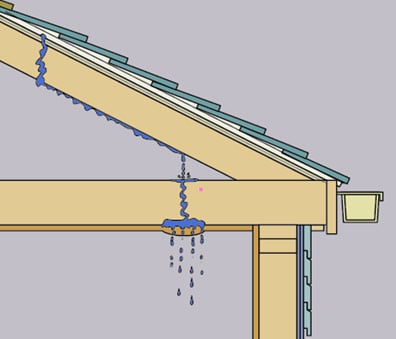
How Leaks Travel
Leaks rarely appear directly below their point of origin. A spreading water stain on the ceiling indicates puddling water. Drive a nail or poke a wire up through the leaking area to drain some of the water into a bucket directly below.
![]()
![]()