Toilet repair is a job that homeowners often end up tackling themselves both because toilet repairs are often reasonably simple and because a non-working toilet is usually an urgent problem. Calling a plumber for a toilet repair often means a high-priced emergency visit. It can also mean a very uncomfortable wait if the toilet doesn’t work.

How to fix a clogged toilet, leaking toilet, or toilet that flushes poorly.
Fortunately, many toilet repairs are relatively easy to do, especially if you have a few DIY skills. All you need is a basic understanding of how the toilet works, some step-by-step guidance, and a few tools, such as a toilet plunger, pliers, screwdriver, and wrench.
If your toilet has a lazy or poor flush, see Fixing a Toilet That Flushes Poorly for additional tips.

How to Unclog a Toilet
You can usually unclog a toilet with a plunger or toilet auger, unless the obstruction is deep inside the drain pipes. Then you may need a professional plumber or drain-clearing pro.
There are two different types of toilet clogs. The most common is a clog that simply prevents the waste and water from going down the drain. The second, and more distressing, is a clog that causes sewage to back up into a bathtub or other fixture when the toilet is flushed.
The first type—the common clog—usually indicates a blockage in the pipe below or immediately adjacent to the toilet. The more serious clog is usually caused by a blockage of toilet paper or other debris in the main drainpipe or the drainpipes beyond the area of the toilet. If your home utilizes a septic system, the second type of clog may mean that the septic tank is full. (For more information, see Septic Tank Care & Maintenance.)
If your toilet is clogged but not backing up into other fixtures, don’t try to flush it or it may overflow. You can usually stop the rise of water before it overflows by lifting up the float ball or float.
1. Remove the lid from the tank and raise the flapper valve to let a little water pass through so you can see whether the toilet is indeed clogged. If it is, water won’t go down the drain.
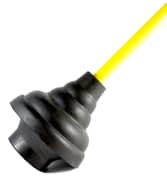
2. If it is clogged, you can first try plunging with a bell-shaped toilet plunger that you can buy on Amazon. Just be aware that, if there is an obstacle jamming the drain, this may impact it further. Instead, it’s usually best to move on to step 3 and use a toilet auger…if you have one. Unfortunately, most people have a plunger but don’t have a toilet auger. So using the plunger generally becomes the best available alternative.
Wearing rubber gloves, place the plunger’s head over the center of the toilet drain hole. Then rapidly push the plunger’s handle up and down to force air and water into the pipe, creating suction to free the clog.
If waste water drains from the toilet, you’ve probably managed to break the clog loose. Gradually pour about a gallon of water from a bucket into the toilet to flush it.
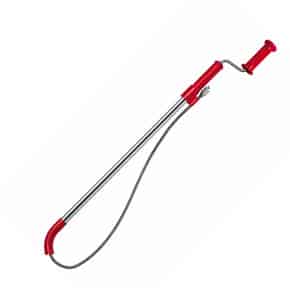
3. To unclog a toilet without a plunger, use a toilet (“closet”) auger. You can attempt to snake out the toilet with a closet auger which will reach down about 3 feet. (This tool is named after “water closet,” a plumbing term for toilet.)
Work the end of the auger down into the drain hole, turning the handle clockwise until the cable won’t go any further. Then push it repeatedly to dislodge and hopefully extract the clog.
If the auger seems to have hooked onto the obstacle, try pulling it out. If it seems balky, work it back and forth carefully so as not to scratch or break the porcelain. If you are able to break through the clog, plunge the toilet again. Here is a helpful video that shows how to properly use a toilet auger:
You can use a longer drain auger (plumbing “snake”) to reach a deeper clog, but you won’t be able to work it through the drain unless you remove the toilet first. (For information on how to remove and replace a toilet, see How to Install a Toilet.) Often, an easier route is to work a long plumbing auger through a nearby clean-out or vent pipe.
4. Snake the main drain. If your plumbing system has a clog that is causing sewage to back up into other fixtures when the toilet is flushed, you can attempt to snake out the main drainpipes yourself with a long drain auger. (For more about how to do this, see How to Snake a Drain Clog.)
Inexpensive drain augers are available for purchase, or you can rent a high-powered model from a tool rental supplier. If this is more than you want to attempt, call a plumber or drain-clearing service.
Fixing a Toilet That Leaks at the Base
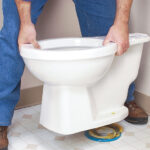
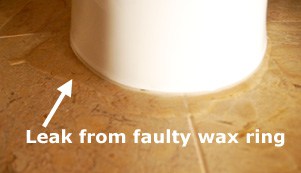
If water pools around the base of your toilet—especially during or immediately following a flush, the cause is usually a failed wax ring between the toilet’s base and the closet flange (waste pipe). If there is water beneath the toilet regardless of whether or not it has been flushed, the water may be from a leaking water supply connection or from condensation. Here is how to fix these issues.
Water that pools around the base of a toilet can be caused by leaking at the “wax ring.” The wax ring is the seal between the toilet and the closet bend (the drainpipe beneath the floor). It also can be caused by faulty seals between the tank and the bowl, the water supply tube, or by a toilet tank that is sweating.
If you can’t tell whether your toilet’s tank is sweating or leaking where the tank connects to the bowl, squeeze a couple of drops of food coloring in the tank water, wait about an hour, and then dab the tank bolts with a white tissue. If the color shows up on the tissue, the tank is leaking. Otherwise, it’s probably sweating or the leak is coming from the water supply.
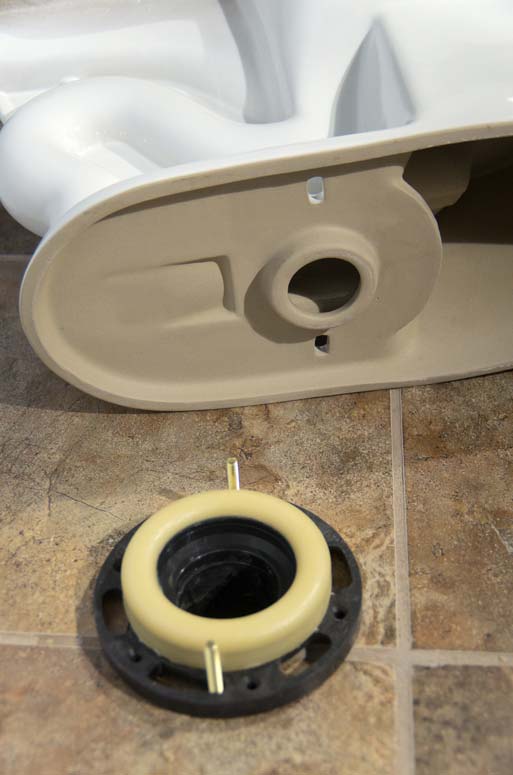
Replacing this ring involves pulling the toilet, so be sure the water is not coming from a leaking toilet tank or water-supply connection before you go to the trouble of replacing the wax ring.
First check for condensation on the surface (sweating). A tank typically sweats in the summer when it is cooler than the ambient air, causing moisture to condense on its surface. When the moisture drips down to the floor, it can cause mildew or—worse—dry rot. Toilet tanks can be easily insulated with a lining of foam rubber or polystyrene to prevent sweating. See below for more about fixing a toilet that sweats.
Next, look for cracks in the tank and bowl. If either the toilet tank or bowl are cracked, replace the entire toilet. For information on how to do this, see How to Install a Toilet.
Use a rag to dry the floor around the toilet’s base. Lay a newspaper beneath the toilet’s tank, wait a few minutes, and check it for drips. If there is no sign of leaking but the water reappears around the base, the wax ring is probably the culprit. If drips appear, check the fittings directly above them for leaks.
When you buy a wax ring replacement, make sure to choose one with a rubber collar, which is less likely to leak in the future. The process of replacing the wax ring is detailed in step-by-step captioned photographs in How to Install a Toilet.
How to Fix a Toilet that Sweats
If water pools around the base of your toilet, one of the toilet’s seals may be leaking. But if you live in a warm, humid climate, check to see if the tank is sweating before you undertake other repairs.
In humid climates, warm room air can condense on the cooler surfaces of a toilet and drip onto the floor. This encourages mold and, over time, can even rot the subflooring. The cold porcelain tank is the problem—it never warms up because, whenever the toilet is flushed, it refills with cold water. When moisture-laden warm air contacts the cold surfaces of the tank, it condenses and “sweats.” Moisture collects and drips down the tank onto the floor.
The simplest quick-fix is to buy a toilet tank drip tray (available on Amazon) that catches the drips behind the bowl. Of course, this is less than attractive and you have to empty it periodically.
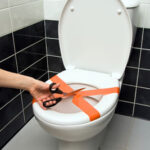
A better, more effective solution for a sweating toilet is to insulate it with a foam toilet tank liner, made to be glued onto the tank’s inner surfaces. Toilet tank liners are available at home improvement centers and from online suppliers.
Empty the water by turning off the supply valve at the wall and flushing the toilet. Wipe down the inner walls of the tank. Cut the insulation panels to fit and attach them according to the label directions.
For a more permanent solution, if you have a two-piece toilet (tank is separate from the bowl), you can replace the tank with an insulated toilet tank. Be sure to get one that will work with your existing toilet model. If you can’t find a match, you can install a completely new toilet that has an insulated tank.
Another option is to talk to a plumber about installing an anti-sweat toilet tank valve on the cold water line that supplies the toilet.
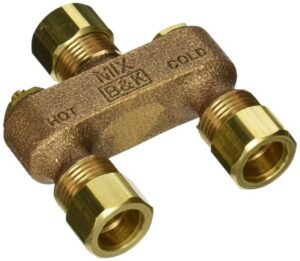
This draws a little hot water from a hot water pipe and mixes it with the cold water entering the toilet tank to raise the tank’s temperature. Be advised that this solution is far from ideal because it will use more energy because the water heater will need to warm the water.
How to Repair a Toilet That Runs
When water runs incessantly from the tank into the bowl, typically making a hissing sound, it wastes many gallons of water every day. A running toilet can be caused by a variety of problems with the float arm, float ball, tank stopper, or inlet valve.
This video offers a pretty thorough look at how to diagnose what needs to be fixed when a toilet is running. However, he leaves out one very important step. PLEASE NOTE: After turning off the water to the toilet, FLUSH THE TOILET to empty the water from the tank. Then put a bucket or bowl under that supply connection to catch the water left in the tank. Otherwise, when you disconnect the supply tube, water will pour out onto the floor!
A toilet runs when water streams or leaks from the toilet tank into the bowl. A constantly running toilet is not only annoying but it also wastes many gallons of water every day.
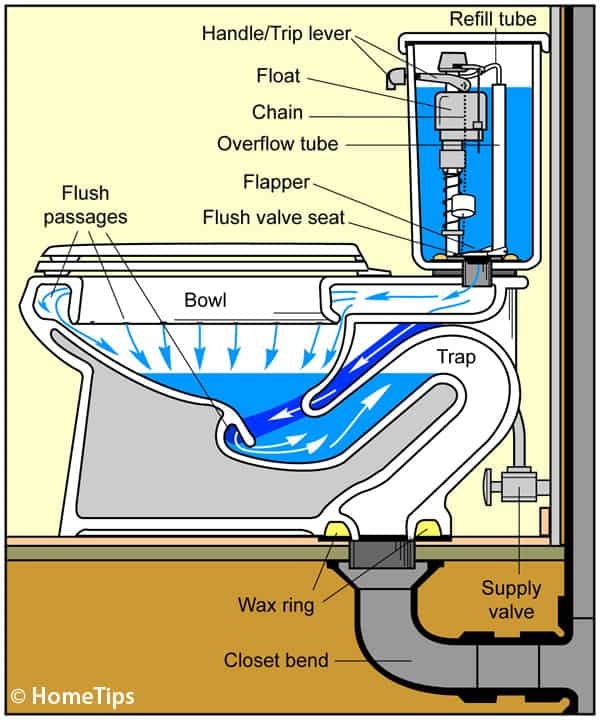
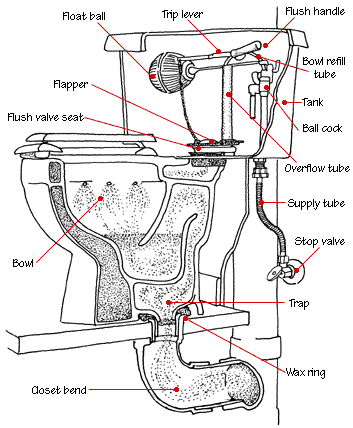
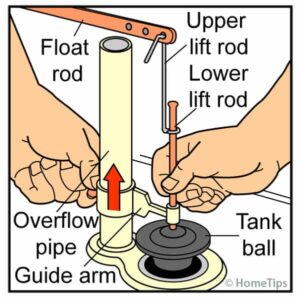
A running toilet can be the result of water leaking through a poorly fitting or defective flapper or tank ball that fails to seal the flush valve between the tank and bowl, or it can be cause by water leaking into the overflow tube. For a clear understanding of what these parts are, see How a Toilet Works & Toilet Plumbing Diagrams.
Can you always tell if your toilet is running and wasting water? Not necessarily. Sometimes it’s obvious—the toilet makes a hissing sound or you can hear the ball cock repeatedly refilling the tank because the water level in the tank slowly drops.
If you’re not sure whether your toilet is running, squeeze a few drops of food coloring into the tank to color the water. After a few minutes, if water is sneaking into the bowl from the tank, the water in the bowl will begin to turn color.
The simplest and most common remedy for a toilet that runs is to jiggle the flush handle. This is often enough to free up a flapper or float ball to properly stop the movement of water from tank to bowl.
When water refills the toilet tank after a flush through the fill valve, it should stop before it reaches the top of the overflow tube. Otherwise, it will continually spill down inside the tube to the bowl. To stop this type of running, you must make an adjustment that prevents the water from rising that high.
If you have a somewhat old float ball flushing mechanism, try lifting the float above water level. If water stops running, bend the float arm (the wire that holds the float ball) slightly downward so that the float ball will reach its shut-off level sooner as the water in the tank rises. The water should shut off automatically when its level is about 1/2 inch below the top of the overflow tube.
Note that the float ball may have leaked and filled up with water so it can’t float properly. To determine whether this has happened, turn off the water supply valve and flush the toilet to empty the tank. Then unscrew the ball from the float arm. You should be able to tell if it contains water by feeling its weight and shaking it. If it has water inside, replace it with a new one. Or, better still, replace the entire valve mechanism with a newer type of valve that doesn’t rely on a float ball.
Whether your toilet utilizes a rubber flapper or a tank ball to seal the flush valve between the tank and the bowl will depend on the age and type of toilet you have; tank balls used to be the standard, but flappers are more common in newer toilets.
If you have the older type of toilet with a tank ball, the mechanism that holds the tank ball may have become misaligned. Reach in and wiggle the tank ball to make sure it is free to move up and down directly over the flush valve. If it doesn’t move freely through its holder, try polishing it with some steel wool.
Be sure the lift wires are properly connected. If this doesn’t do the trick, replace the tank ball mechanism with a flapper.
Replacement flappers made for all types of toilets are available for under $10. Flappers are particularly simple to install after you remove the old flapper or tank ball—you just slide the collar down the overflow tube, centering the flapper over the valve seat, and hook up the lift chain to the trip lever so that it has a little slack. Instructions are given on most flapper product labels.
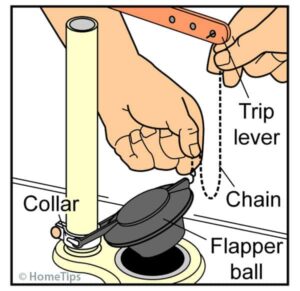
If a lift chain connects the flapper to the trip lever, check it. This often becomes kinked or snagged so that it doesn’t allow the flapper or tank ball to seat properly. If this has happened, adjust it. Also check the two rubber ears on the collar of the flapper to make sure they hinge properly on the overflow tube.
Before you actually replace a flapper or make other types of repairs inside the tank, turn off the water to the toilet at the shut-off valve located behind the toilet. Then flush the toilet once to drain the water from the tank.
After installing a new flapper, test it to make sure it flops up and down easily. Then turn the water supply shut-off valve back on to refill the toilet tank and do a test flush. If the flapper closes too quickly, check the lift chain’s length—pull it tight and then back it off one link and reattach it.
In some cases, replacing the flapper won’t fix the problem. Some toilets have a corroded flush valve seat that will continue to leak. You can try scouring the flush valve seat with steel wool or a special tool made for this purpose. Or you can replace the entire assembly, which is a considerably bigger job. Follow the instructions that come with the toilet valve seat replacement kit.
Fixing a Slow-Flushing Toilet
If a toilet has been working fine but suddenly flushes or drains very slowly, the problem is usually a clogged drain.
If you’ve plunged and snaked out the drain but your toilet still flushes poorly, it may be the toilet’s siphoning action.
When a toilet is flushed, water rushes from the tank through the valve seat, around the rim, and through a siphon jet chamber built into the porcelain at the front of the bowl.
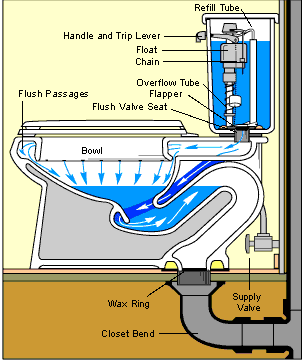
As the water encircles the rim, some washes down through the rinse holes in the underside of the rim. The rush of water causes a cleansing action and creates enough force to push waste out through the back of the bowl and down into the waste pipe.
First, open the tank and check the water level. A low water level means there may not be enough force to kick off the siphoning action.
Toilets are designed so that the tank, when filled to the top of the overflow tube, holds enough water for a good flush.
Water-saving devices such as dams, bottles, or bending the float rod will foil the design. You’re better off getting a toilet that’s designed to be a water-saving fixture.
Flush the toilet and make sure the flapper allows all of the tank’s water to complete the flush.
If the water level looks fine, the rinse holes may be clogged with mineral deposits, particularly where hard water is a problem. You can clear the rinse holes located just under the rim or near the back of the bowl using a short piece of coat hanger (first turn off the toilet’s shut-off valve and flush the toilet to get rid of most of the bowl’s water).
Lime remover can dissolve built-up minerals in the toilet’s channels, but this will take eight hours or more. The idea is to dam up the orifices so the lime remover can go to work. Pack the holes with wet paper towels and hold them in place with a generous supply of plumber’s putty. Then pour about a quart of lime remover into the overflow tube and let it sit. (Reports from readers are that Dawn detergent works also.)
An inadequate flush can also be caused by a broken link between the handle and trip lever or a tank stopper that closes before the tank empties.