This article is a continuation of the discussion that began with Step 1: How to Install Vinyl and Aluminum Siding and Step 2: How to Prepare Walls for Vinyl or Aluminum Siding.

Step 3: Install Starter Strips & Trim
Now you’re ready to begin installation of the starter strips and corner posts that receive the siding panels. This begins with techniques for preparing the existing wall and moves through installation of all siding and trim.

Some of these mounting strips are the same for both horizontal and vertical siding. Others are not. Vertical siding, for example, uses a base trim along the bottom instead of a starter strip and/or spacer. Because horizontal siding is by far the most common type used, we focus on its installation here. You may need to adapt the instructions slightly for vertical siding, as discussed in the article How to Install Vertical Vinyl Siding.
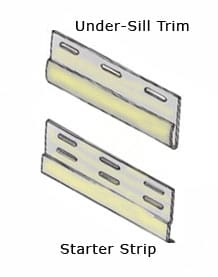
Vinyl Siding Starter Strips
Snap a level chalk line for the first starter strip at the base of the wall, no less than 8 inches above ground level, after determining the lowest corner of the house. This is where the new siding will begin. This chalk line should be level and a consistent distance from the eaves or the top and bottom of the windows.
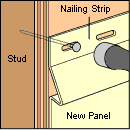
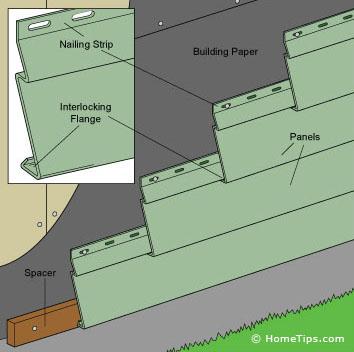
Most manufacturers produce a starter strip that secures the bottom course of siding to the sheathing and holds it at the proper angle. As shown in the diagram, a wooden spacer can be used to provide the proper angle for the first strip. This should be nailed every 6 inches, with it’s lower edge running along the chalk line.
In cases where the lower portion of a horizontal siding panel must be trimmed so that it may be installed over areas such as steps and porches, make sure the panel is furred out with a similar spacer for proper angle and rigidity. To seal the edge of a siding panel where it has been cut and to secure it to the wall, you can use under-sill trim.
When installing the starter strips allow a 1/8-inch space for corner posts and J- channels for expansion. Keep ends of adjoining starter strips at least 1/4 inch apart to allow for expansion. Nail in the center of the nailing slots. If using insulation or backerboard, shim if necessary to accommodate the added thickness.
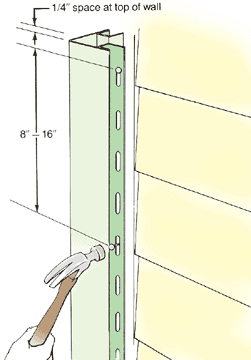
Install Corner Posts
Position corner posts at exterior and interior corners, and suspend them by two nails driven into the uppermost slot. After checking with a level for plumb, nail them every 12 inches. If you need to stack posts end-to-end to reach the full height of the wall, cut 1/4 inch from the bottom of the top post and position it so that it overlaps the lower post by 1 inch or so so it will shed water.
Install Door & Window Trim
Before installing door and window trim, first caulk around the openings to create a moisture- and air-proof seal. Install the tops first, then the sides, and then the bottoms of the window surrounds. Along the tops, install J-channel trim with horizontal siding and base trim with vertical siding.
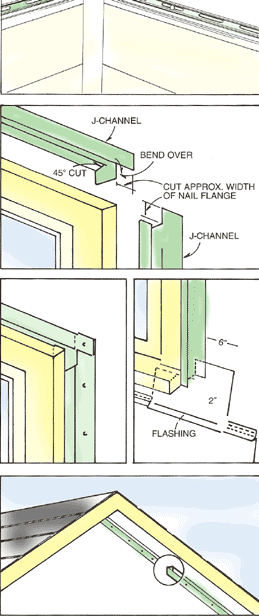
Cut the trim so it is two channel widths longer than the opening’s width. Miter or cut tabs at the ends. Nail the trim every 12 inches on center. Nail the side pieces every 12 inches, placing the top nail at the top of the nailing slot and all other nails in the center of the nailing slot. If the top is mitered, miter the sides as well. At the bottoms of windows, install under-sill trim for horizontal siding and J-channel trim for vertical siding.
Install Trim Under Eaves & Rakes
For horizontal siding, install F-channel trim at the soffit and gable rake. For vertical siding, install J-channel trim. Nail every 12 inches on center.