An expert DIY guide for replacing and repairing vinyl siding, with a walkthrough and a six-minute video that shows vinyl siding repairs in action.

Because vinyl siding is fairly thin, all it takes to crack or punch a hole in it is a rock thrown by a lawnmower or a hard-hit baseball.
Holes and cracks in vinyl siding can be more than an esthetic problem—they allow rain and weather to get in behind the siding, which can eventually compromise the wall.
So it’s important to fix broken siding.
There are two approaches to repairing vinyl siding. The right direction to take will depend upon the type and size of the damage. You can 1) cover the crack or hole with a vinyl patch (“vinyl siding repair kit”), or 2) replace a section of the damaged piece.
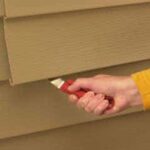
The easiest and fastest repair is to use a vinyl siding repair kit. Available online for about $50, one of these kits has a couple of durable adhesive-backed PVC patches.
To use it, you just clean the surface around the damaged area, stick-on the transparent patch, and, where necessary, touch up with matching paint.
The patch is strong but made from very thin PVC so that the siding’s grain will show through it, which helps it blend in with the existing siding.
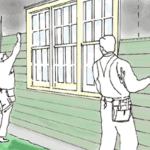
The more thorough and permanent solution is to replace the damaged siding.
The trick when doing this is to find a replacement that will match your existing siding. If your existing siding has been on the house for a while or has received a lot of direct sun, it’s likely to be faded. When replacing it with a new piece, the replacement piece will be obvious. So your best bet is to take a piece of existing siding from a less visible place, such as the back of the house or the side of the garage.
Then you can replace that piece with new siding and nobody will ever know.
If a large area of your vinyl siding has been cracked or punctured, or if it has pulled away from the house, you will need to replace the entire damaged section.
If you feel the job is too much to handle, you can always get quotes from local siding contractors.
To do the job yourself you will need:
* A new section that matches the damaged section
* A special “zipper” or “zip tool” (siding removal tool) to separate the panels
* Polyurethane caulking
* A utility knife
* A carpenter’s square
* A pencil
* Tin snips or a backsaw
Your work will go more easily if you replace the vinyl when the weather is warm because vinyl is easier to manipulate when it is flexible.
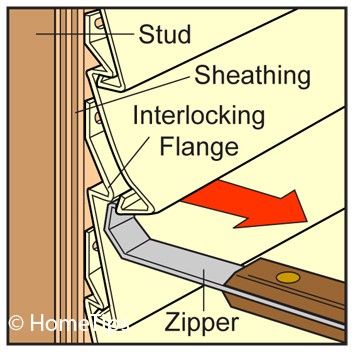
A special tool, sometimes called a “zip tool,” is made for unhooking the locking channels of vinyl siding. You can buy one of these for under $10. If you’ll be removing very much siding, it will make the job a lot easier—but you can pry apart the locking channels by hand, as shown in this video:
Using the zipper, unlock the panel above the damaged one, pulling it down out of the interlocking flange. Once you get it started at one end, just work along the entire length to release the rest of the panel.
Then, using a pry bar or a hammer’s claw, pry out the nails that hold the damaged panel in place.

Mark cutting lines on each side of the damaged area using the carpenter’s square and pencil. Cut the panel along the lines with a sharp utility knife, tin snips, or a backsaw and remove the damaged section.
Then, cut a replacement piece, making it 2 inches longer than the section you just removed to allow for a 1-inch overlap at each end. (Cut the piece only 1 inch longer if the damaged section ends at a corner or joint.)
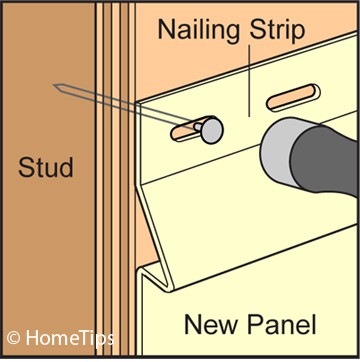
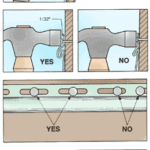
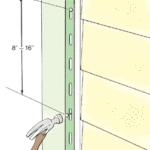
Cut two inches off of the nailing flange at each end so the replacement will sit flat. Then snap the bottom edge of the new section in place and nail the nailing strip with nails that penetrate 1 1/2 inches. Nail every 16 inches, centering the nails in the nailing slots. Don’t pound the nails down flat against the nailing strip—leave them slightly loose so the panels can expand and contract with changes in temperature.
Using the zipper, pull the upper panel back down into the channel of the replacement and snap it into place. Continue along the full length of the replacement.