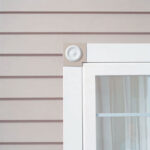
Expert advice and diagrams on how to install vinyl and aluminum exterior siding, including tips on tools, fasteners and replacing vinyl siding and trim.


Vinyl and aluminum sidings come in a variety of panel sizes, for installing horizontally or vertically, and are merchandised as complete systems including all the necessary parts and pieces. Because they are lightweight materials, unlike steel, an experienced do-it-yourselfer with the proper tools can reasonably undertake an aluminum or vinyl siding project.
When you purchase your siding, make sure to pick up an instruction booklet. Though each brand comes with its own directions, the requirements and techniques for installing both aluminum and vinyl are pretty much the same. The surface to which the panels attach must be smooth so that they lie flat. For aluminum and vinyl, 3/8-inch foam board insulation is a reliable backing choice.
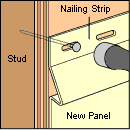
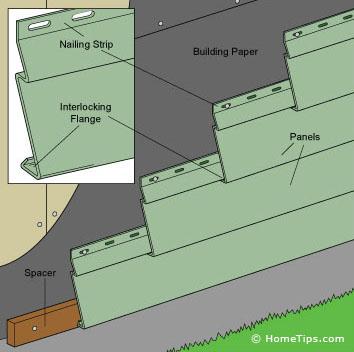
A vinyl siding system consists of various trim pieces, such as J-channels, corner posts, and other trim pieces. All of these are installed first, and then the siding panels themselves are installed. The panels are mounted from the bottom up, in an overlapping manner and with their edges contained by the various trim pieces.
Please see more about siding system components in the article, Vinyl & Aluminum Siding Buying Guide.
Step 1: Gather the Materials & Tools You’ll Need
If you’re planning a do-it-yourself installation of vinyl siding, you’ll need to buy materials and gather the necessary tools. For a complete discussion of the siding, channels, and other accessories you’ll need, see Vinyl Siding Buying Guide.
Some of the tools required are relatively common, but others are specially made for the task. The latter are generally available where you buy the siding. Here is a look at what you will need.
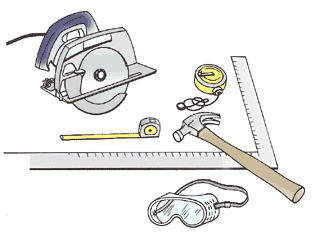
Standard Carpentry Tools
Common hand tools such as a hammer, fine-tooth saw, square, chalk line, level, and rule are needed for proper installation. Wear safety glasses to protect your eyes.
Siding Cutting Tools
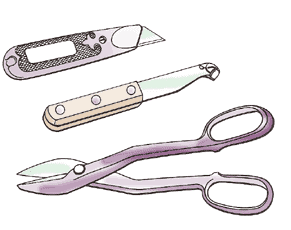
Because of the vinyl is relatively soft and thin, it is easy to cut, trim, and score the material with a utility knife or scoring tool. A good-quality pair of tin snips or compound-leverage aviation-type snips will speed the cutting and shaping of the vinyl and can be especially helpful for cutting curves.
Power Saw for Cutting Siding Vinyl
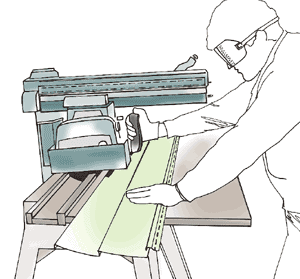
A bench or radial-arm power saw can speed the cutting and installation of vinyl siding. Your best bet is to buy a saw blade that is made for the purpose of cutting this siding. As an alternative, a fine-tooth blade with 12 to 16 teeth per inch can be used—it should be mounted on the saw in the reverse of its normal direction. Never use it this way on other materials such as aluminum, wood, or plywood.
Always wear safety glasses or goggles when cutting siding with a saw.
In extremely cold weather, move the saw through the material slowly. Some applicators prefer a hand-held power circular saw, but it can be difficult to execute straight cuts with one of these.
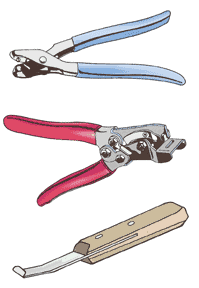
Special Vinyl Siding Tools
A snap-lock punch, available from a siding dealer, is used to punch ears or lugs in the cut edges of siding to be used for the top or finishing course. The punched edge will engage and lock in the installed under-sill trim or finish trim. If it is necessary to nail the cut edge of a panel, use a nail-hole punch to make the required hole, which is elongated to allow for expansion and contraction.
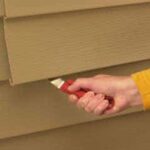
To remove or replace a siding panel, use an unlocking tool. Insert the curved end of the tool under the end of the panel and hook it onto the back lip of the butt lock. To disengage the lock, pull downward and slide the tool along the length of the panel. Use in the same manner to install a panel.
Nails for Vinyl or Aluminum Siding
Vinyl and aluminum siding can be fastened with hammer and nails or by using a power nailer or stapler. For more about the latter, see Power-Nailing & Stapling Vinyl Siding.
Nails for aluminum and vinyl siding differ slightly:
For vinyl siding, use aluminum, galvanized steel, or other corrosion-resistant nails. Nail in the center of the slot. Space nails a maximum of 16 inches for horizontal siding, 12 inches for vertical, and 6 to 12 inches for accessories.
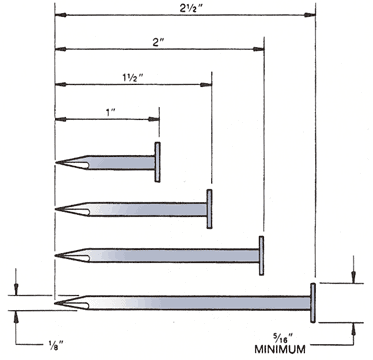
Select only corrosion-resistant nails that are long enough to allow for 3/4-inch penetration into a solid, nailable surface. Length is typically 1 1/2 inch for general use, 2 inches for residing, and a minimum of 2 1/2 inches for going through siding with backerboard. For trim, 1 to 1 ½-inch nails are typical. Nail heads should be, at minimum, 5/16 inch in diameter and shanks should be 1/8 inch in diameter.
Be sure the nails hold the panels securely. The panels should float on the nails to provide for expansion and contraction. Do not nail panels at an angle; this can pull the siding up or down. Nail into studs where possible (check the manufacturer’s recommendations if your wall studs are 24 inches on center).
For more about nailing, see How to Nail Vinyl Siding.
For aluminum siding, only use aluminum nails. The nails should have 1/8-inch shanks, heads at least 5/16 inch in diameter, and be able to penetrate backing by at least 3/4 inch. In general, 4d (1 1/2-inch) nails will do the job. When nailing aluminum panels, place the nails in the middle of the nailing slots and do not drive them in all the way. Siding panels should hang from the nails, not be nailed fast.
Sheathing or Backerboard for Vinyl Siding

Vinyl siding is a relatively thin, flexible material and, as such, should be applied over a smooth, flat surface of wall sheathing or backerboard that is securely nailed to wall framing. Weather-resistant sheathing in a minimum thickness of ¼ inch is recommended. Backerboard can be used instead, but, if it is, the following specifications are recommended:
• The bottom of the backerboard should rest on top of the nail rail of the preceding course (see siding installation).
• The top of the backerboard should be even with the top of the siding panel so that the nails or staples pass through the backerboard.
• Do not force the backer down into the butt of the siding panel.
Some manufacturers of vinyl siding do not recommend using drop-in backerboard with certain vinyl siding configurations. Consult your manufacturer for specific recommendations.